> ## Documentation Index
> Fetch the complete documentation index at: https://mcp.transdocs.org/llms.txt
> Use this file to discover all available pages before exploring further.
# 构建 MCP 服务器
> 开始构建自己的服务器,以便在 Claude for Desktop 及其他客户端中使用。
在本教程中,我们将构建一个简单的 MCP 天气服务器,并将其连接到宿主——Claude for Desktop。我们将从基础设置开始,然后逐步扩展到更复杂的用例。
### 我们将构建什么
目前,许多大语言模型尚无法获取天气预报和严重天气警报。让我们借助 MCP 来解决这一问题!
我们将构建一个服务器,公开两个工具:`get_alerts` 和 `get_forecast`。随后,将该服务器连接到 MCP 宿主(本例中为 Claude for Desktop):
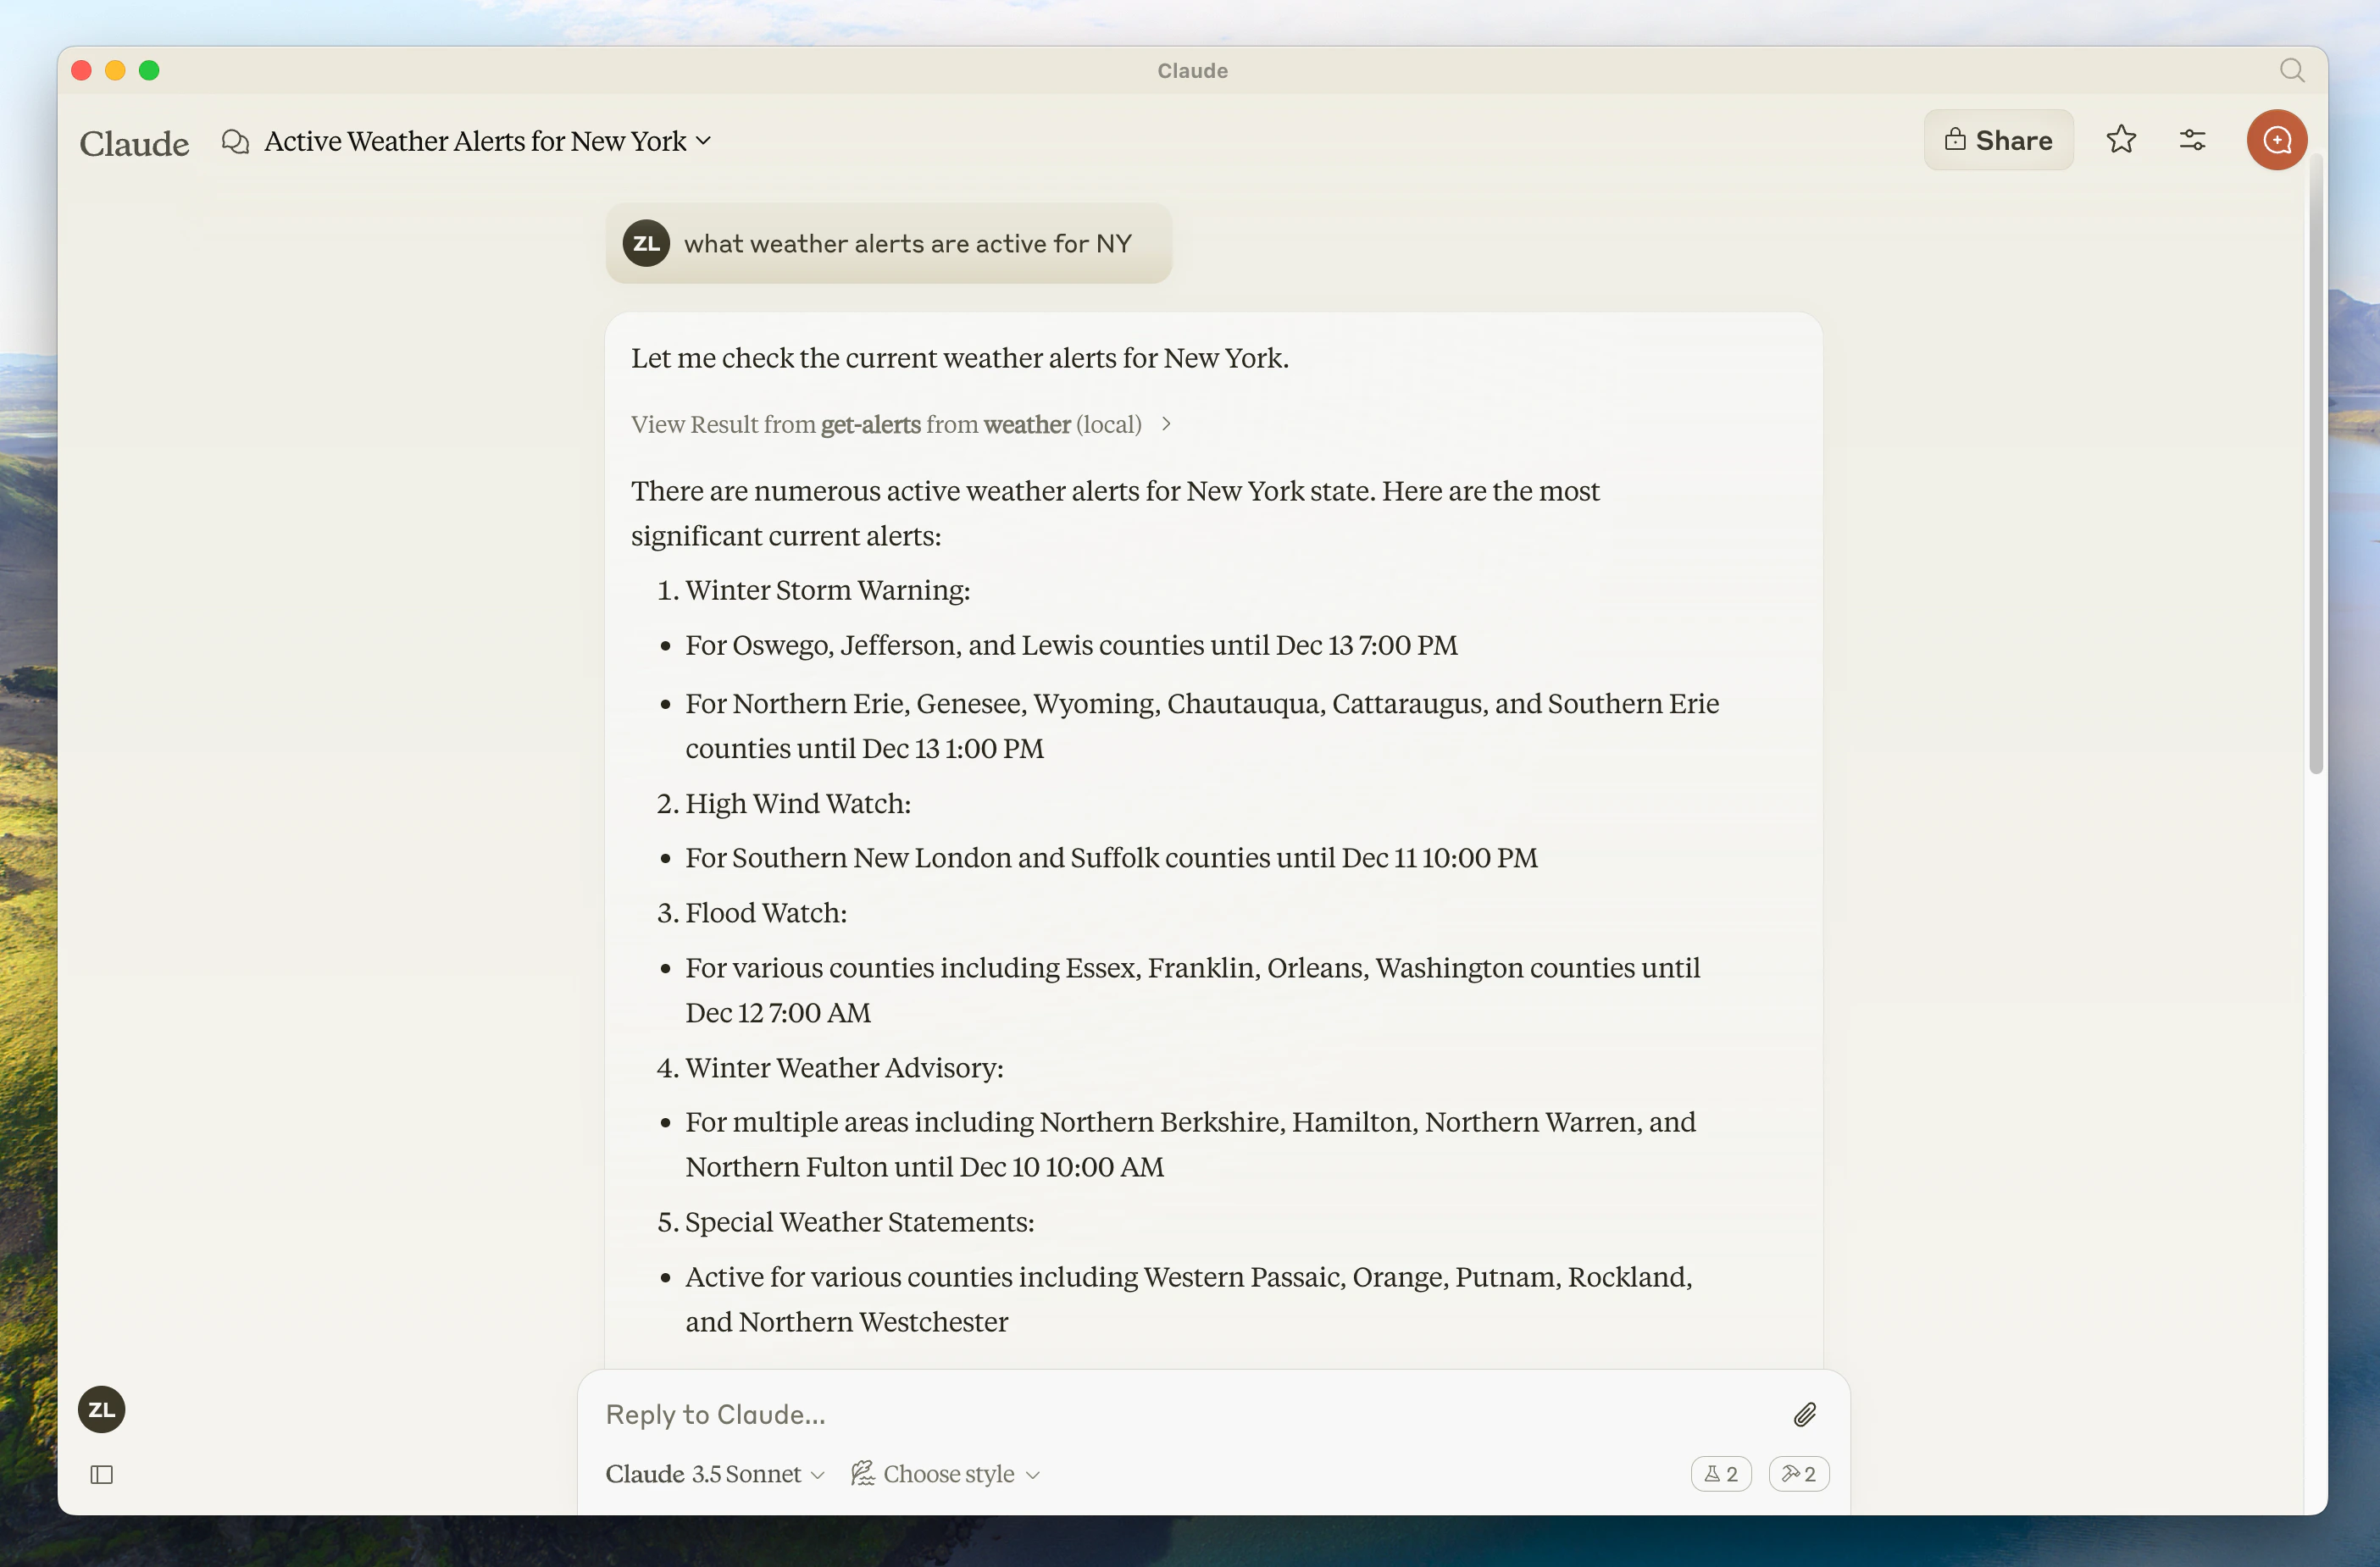
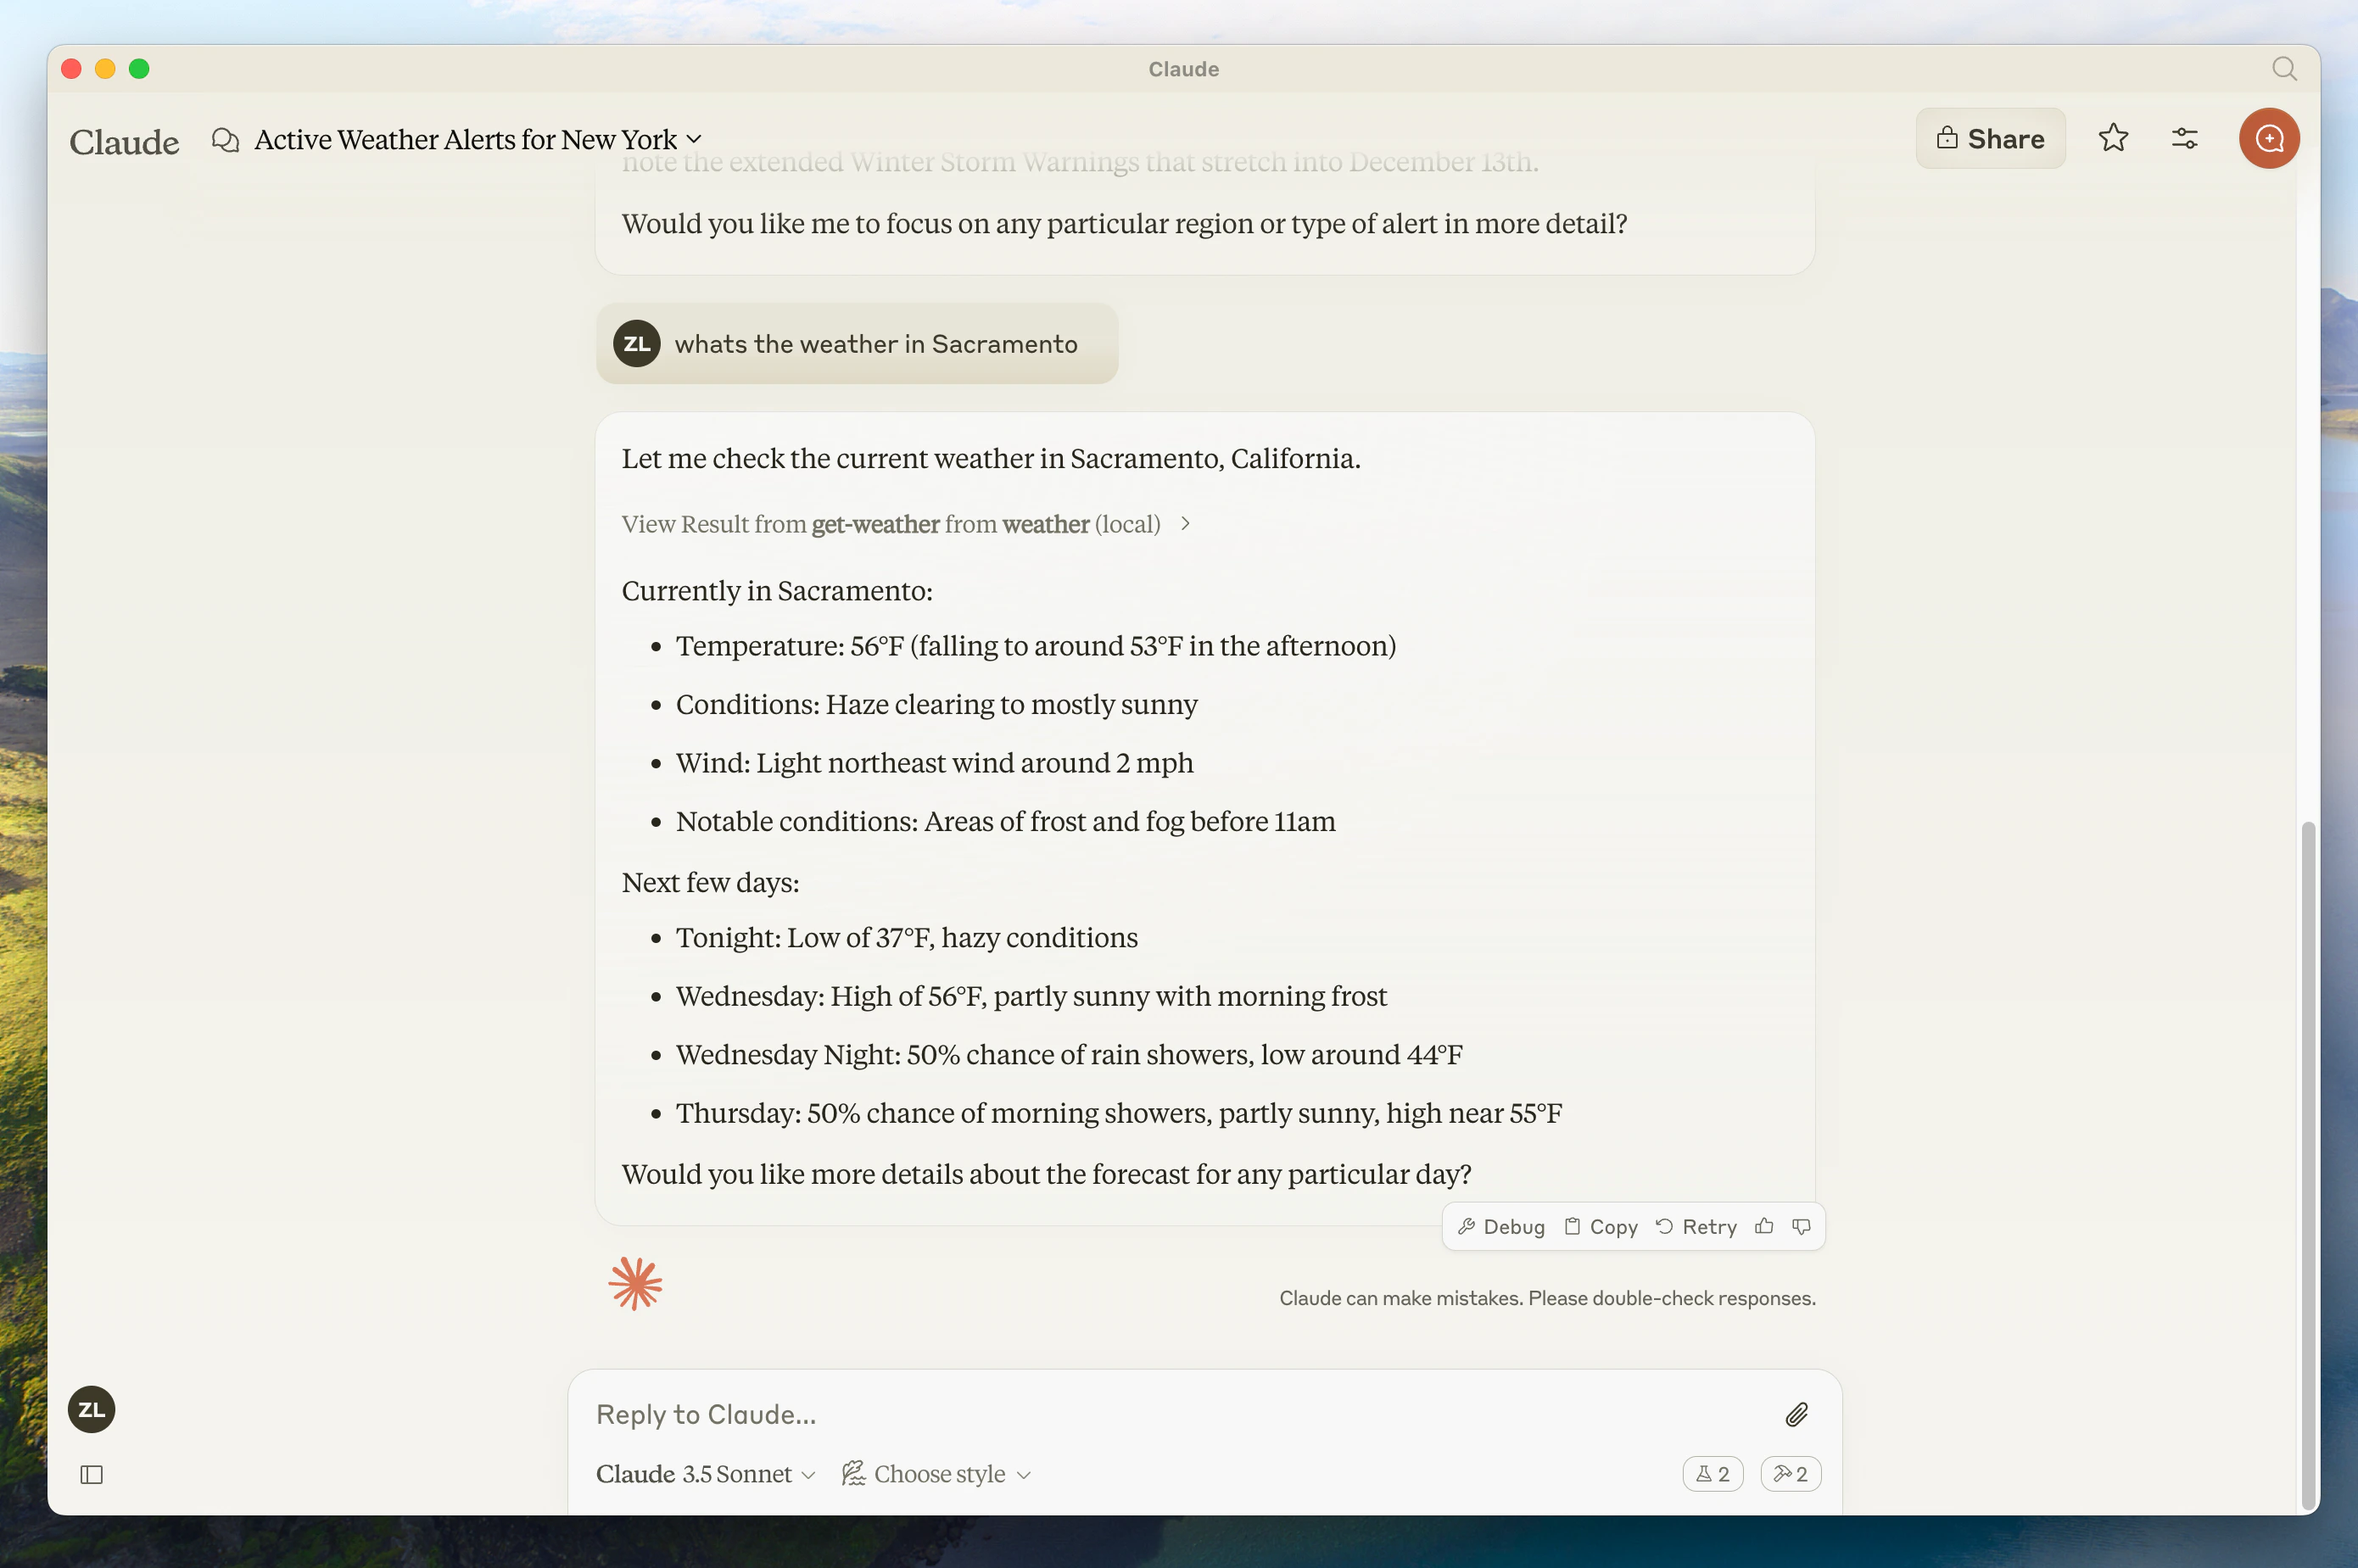 服务器可以连接到任何客户端。此处我们选择 Claude for Desktop 以简化流程,但我们也提供了[构建自有客户端](/quickstart/client)的指南,以及[其他客户端列表](/clients)。
### MCP 核心概念
MCP 服务器可提供三种主要能力:
1. **资源**:可被客户端读取的类文件数据(如 API 响应或文件内容)
2. **工具**:可由 LLM 调用的函数(需用户批准)
3. **提示**:帮助用户完成特定任务的预编写模板
本教程主要聚焦于工具。
让我们开始构建天气服务器
### 前置知识
本快速入门假设你已熟悉:
* Python
* Claude 等 LLM
### MCP 服务器中的日志记录
在实现 MCP 服务器时,请谨慎处理日志记录:
**对于基于 STDIO 的服务器:** 切勿写入标准输出(stdout)。这包括:
* Python 中的 `print()` 语句
* JavaScript 中的 `console.log()`
* Go 中的 `fmt.Println()`
* 其他语言中类似的 stdout 函数
写入 stdout 会破坏 JSON-RPC 消息,导致服务器失效。
**对于基于 HTTP 的服务器:** 标准输出日志记录是可接受的,因为它不会干扰 HTTP 响应。
### 最佳实践
1. 使用写入 stderr 或文件的日志库。
### 快速示例
```python theme={null}
# ❌ 不好的做法(STDIO)
print("正在处理请求")
# ✅ 好的做法(STDIO)
import logging
logging.info("正在处理请求")
```
### 系统要求
* 已安装 Python 3.10 或更高版本。
* 必须使用 Python MCP SDK 1.2.0 或更高版本。
### 配置环境
首先,安装 `uv` 并设置我们的 Python 项目及环境:
```bash macOS/Linux theme={null}
curl -LsSf https://astral.sh/uv/install.sh | sh
```
(原文为空,无需翻译)
```powershell Windows theme={null}
powershell -ExecutionPolicy ByPass -c "irm https://astral.sh/uv/install.ps1 | iex"
```
之后请务必重新启动终端,以确保系统能识别 `uv` 命令。
现在,我们来创建并设置项目:
```bash macOS/Linux theme={null}
# 为项目创建新目录
uv init weather
cd weather
# 创建虚拟环境并激活
uv venv
source .venv/bin/activate
# 安装依赖
uv add "mcp[cli]" httpx
# 创建服务器文件
touch weather.py
```
(由于您未提供需要翻译的Markdown文本,因此此处无可翻译内容。请提供需要翻译的文本,我将立即为您翻译。)
```powershell Windows theme={null}
# 为我们的项目创建一个新目录
uv init weather
cd weather
# 创建虚拟环境并激活
uv venv
.venv\Scripts\activate
# 安装依赖
uv add mcp[cli] httpx
# 创建我们的服务器文件
new-item weather.py
```
现在让我们深入构建你的服务器。
## 构建你的服务器
### 导入包并设置实例
将这些内容添加到你的 `weather.py` 顶部:
```python theme={null}
from typing import Any
import httpx
from mcp.server.fastmcp import FastMCP
# 初始化 FastMCP 服务器
mcp = FastMCP("weather")
# 常量
NWS_API_BASE = "https://api.weather.gov"
USER_AGENT = "weather-app/1.0"
```
FastMCP 类利用 Python 的类型提示和文档字符串自动生成工具定义,使得创建和维护 MCP 工具变得简单。
### 辅助函数
接下来,我们添加用于查询并格式化来自国家气象局 API 数据的辅助函数:
```python theme={null}
async def make_nws_request(url: str) -> dict[str, Any] | None:
"""向 NWS API 发起请求,并附带适当的错误处理。"""
headers = {
"User-Agent": USER_AGENT,
"Accept": "application/geo+json"
}
async with httpx.AsyncClient() as client:
try:
response = await client.get(url, headers=headers, timeout=30.0)
response.raise_for_status()
return response.json()
except Exception:
return None
def format_alert(feature: dict) -> str:
"""将警报要素格式化为可读字符串。"""
props = feature["properties"]
return f"""
事件: {props.get('event', '未知')}
区域: {props.get('areaDesc', '未知')}
严重程度: {props.get('severity', '未知')}
描述: {props.get('description', '无可用描述')}
指示: {props.get('instruction', '未提供具体指示')}
"""
```
### 实现工具执行
工具执行处理器负责实际执行每个工具的逻辑。我们来添加它:
```python theme={null}
@mcp.tool()
async def get_alerts(state: str) -> str:
"""获取美国某州的天气预警。
Args:
state: 两位字母的美国州代码(例如 CA、NY)
"""
url = f"{NWS_API_BASE}/alerts/active/area/{state}"
data = await make_nws_request(url)
if not data or "features" not in data:
return "无法获取预警或未找到预警。"
if not data["features"]:
return "该州暂无活跃预警。"
alerts = [format_alert(feature) for feature in data["features"]]
return "\n---\n".join(alerts)
@mcp.tool()
async def get_forecast(latitude: float, longitude: float) -> str:
"""获取某地点的天气预报。
Args:
latitude: 地点的纬度
longitude: 地点的经度
"""
# 首先获取预报网格端点
points_url = f"{NWS_API_BASE}/points/{latitude},{longitude}"
points_data = await make_nws_request(points_url)
if not points_data:
return "无法获取该地点的预报数据。"
# 从 points 响应中获取预报 URL
forecast_url = points_data["properties"]["forecast"]
forecast_data = await make_nws_request(forecast_url)
if not forecast_data:
return "无法获取详细预报。"
# 将时段格式化为可读预报
periods = forecast_data["properties"]["periods"]
forecasts = []
for period in periods[:5]: # 仅显示接下来 5 个时段
forecast = f"""
{period['name']}:
温度: {period['temperature']}°{period['temperatureUnit']}
风力: {period['windSpeed']} {period['windDirection']}
预报: {period['detailedForecast']}
"""
forecasts.append(forecast)
return "\n---\n".join(forecasts)
```
### 运行服务器
最后,让我们初始化并启动服务器:
```python theme={null}
if __name__ == "__main__":
# 初始化并运行服务器
mcp.run(transport='stdio')
```
你的服务器已经完成!运行 `uv run weather.py` 来启动 MCP 服务器,它将监听来自 MCP 主机的消息。
现在,让我们用现有的 MCP 主机——Claude for Desktop——来测试你的服务器。
## 使用 Claude for Desktop 测试你的服务器
Claude for Desktop 尚未在 Linux 上推出。Linux 用户可以跳转到[构建客户端](/quickstart/client)教程,构建一个连接到刚才所建服务器的 MCP 客户端。
首先,请确保你已安装 Claude for Desktop。[可在此处安装最新版本。](https://claude.ai/download) 如果你已经安装了 Claude for Desktop,**请确保更新到最新版本。**
我们需要为要使用的任何 MCP 服务器配置 Claude for Desktop。为此,请在文本编辑器中打开 Claude for Desktop 应用配置:`~/Library/Application Support/Claude/claude_desktop_config.json`。如果该文件不存在,请务必创建它。
例如,如果你已安装 [VS Code](https://code.visualstudio.com/):
```bash macOS/Linux theme={null}
code ~/Library/Application\ Support/Claude/claude_desktop_config.json
```
# 使用指南
## 安装
### 系统要求
* Python 3.8 或更高版本
* pip 包管理器
* 至少 2 GB 可用磁盘空间
### 安装步骤
1. 克隆仓库:
```bash theme={null}
git clone https://github.com/example/project.git
cd project
```
2. 创建并激活虚拟环境:
```bash theme={null}
python -m venv venv
source venv/bin/activate # Windows 使用 venv\Scripts\activate
```
3. 安装依赖:
```bash theme={null}
pip install -r requirements.txt
```
## 快速开始
### 启动服务
```bash theme={null}
python main.py
```
默认情况下,服务将在 `http://localhost:8000` 启动。
### 测试端点
```bash theme={null}
curl -X GET http://localhost:8000/health
```
预期响应:
```json theme={null}
{"status": "ok"}
```
## 配置
配置文件位于 `config/settings.yaml`:
```yaml theme={null}
server:
host: "0.0.0.0"
port: 8000
database:
url: "sqlite:///app.db"
```
## 故障排查
### 常见问题
| 问题 | 可能原因 | 解决方案 |
| ------- | ------ | ----------------------- |
| 启动失败 | 端口被占用 | 修改 `settings.yaml` 中的端口 |
| 数据库连接错误 | 路径错误 | 检查 `database.url` 配置 |
| 权限错误 | 文件权限不足 | 运行 `chmod +x main.py` |
### 获取帮助
* 查看 [FAQ](docs/faq.md)
* 在 [讨论区](https://github.com/example/project/discussions) 提问
* 提交 [Issue](https://github.com/example/project/issues)
```powershell Windows theme={null}
code $env:AppData\Claude\claude_desktop_config.json
```
接下来在 `mcpServers` 键里添加服务器。只有当至少一个服务器正确配置后,MCP 的 UI 元素才会在 Claude for Desktop 里出现。
此时我们像这样添加单个天气服务器:
```json macOS/Linux theme={null}
{
"mcpServers": {
"weather": {
"command": "uv",
"args": [
"--directory",
"/ABSOLUTE/PATH/TO/PARENT/FOLDER/weather",
"run",
"weather.py"
]
}
}
}
```
(由于您没有提供需要翻译的文本,这里为空)
```json Windows theme={null}
{
"mcpServers": {
"weather": {
"command": "uv",
"args": [
"--directory",
"C:\\ABSOLUTE\\PATH\\TO\\PARENT\\FOLDER\\weather",
"run",
"weather.py"
]
}
}
}
```
你可能需要在 `command` 字段中填写 `uv` 可执行文件的完整路径。你可以通过运行 `which uv`(macOS/Linux)或 `where uv`(Windows)来获取。
请确保传入服务器的绝对路径。你可以通过运行 `pwd`(macOS/Linux)或 `cd`(Windows 命令提示符)来获取。在 Windows 上,请记得在 JSON 路径中使用双反斜杠(`\\`)或正斜杠(`/`)。
这告诉 Claude for Desktop:
1. 有一个名为 “weather” 的 MCP 服务器
2. 通过运行 `uv --directory /ABSOLUTE/PATH/TO/PARENT/FOLDER/weather run weather.py` 来启动它
保存文件,并重启 **Claude for Desktop**。
让我们开始构建天气服务器
### 前置知识
本快速入门假设你已熟悉:
* TypeScript
* 像 Claude 这样的 LLM
### MCP 服务器中的日志记录
实现 MCP 服务器时,请谨慎处理日志:
**对于基于 STDIO 的服务器:** 永远不要写入标准输出(stdout)。这包括:
* Python 中的 `print()` 语句
* JavaScript 中的 `console.log()`
* Go 中的 `fmt.Println()`
* 其他语言中类似的 stdout 函数
写入 stdout 会破坏 JSON-RPC 消息并使服务器崩溃。
**对于基于 HTTP 的服务器:** 标准输出日志记录是可以的,因为它不会干扰 HTTP 响应。
### 最佳实践
1. 使用写入 stderr 或文件的日志库,例如 Python 中的 `logging`。
2. 对于 JavaScript,尤其要小心 —— `console.log()` 默认写入 stdout
### 快速示例
```javascript theme={null}
// ❌ 错误(STDIO)
console.log("Server started");
// ✅ 正确(STDIO)
console.error("Server started"); // stderr 是安全的
```
### 系统要求
对于 TypeScript,请确保已安装最新版本的 Node。
### 配置环境
首先,如果尚未安装 Node.js 和 npm,请先进行安装。你可以从 [nodejs.org](https://nodejs.org/) 下载。
验证你的 Node.js 安装:
```bash theme={null}
node --version
npm --version
```
在本教程中,你需要 Node.js 16 或更高版本。
现在,让我们创建并设置我们的项目:
```bash macOS/Linux theme={null}
# 为我们的项目创建一个新目录
mkdir weather
cd weather
# 初始化一个新的 npm 项目
npm init -y
# 安装依赖
npm install @modelcontextprotocol/sdk zod@3
npm install -D @types/node typescript
# 创建我们的文件
mkdir src
touch src/index.ts
```
(原文为空,无内容需要翻译)
```powershell Windows theme={null}
# 为我们的项目创建一个新目录
md weather
cd weather
# 初始化一个新的 npm 项目
npm init -y
# 安装依赖
npm install @modelcontextprotocol/sdk zod@3
npm install -D @types/node typescript
# 创建我们的文件
md src
new-item src\index.ts
```
更新你的 package.json,添加 `"type": "module"` 和一个 build 脚本:
```json package.json theme={null}
{
"type": "module",
"bin": {
"weather": "./build/index.js"
},
"scripts": {
"build": "tsc && chmod 755 build/index.js"
},
"files": ["build"]
}
```
在项目根目录下创建一个 `tsconfig.json`:
```json tsconfig.json theme={null}
{
"compilerOptions": {
"target": "ES2022",
"module": "Node16",
"moduleResolution": "Node16",
"outDir": "./build",
"rootDir": "./src",
"strict": true,
"esModuleInterop": true,
"skipLibCheck": true,
"forceConsistentCasingInFileNames": true
},
"include": ["src/**/*"],
"exclude": ["node_modules"]
}
```
现在让我们深入构建你的服务器。
## 构建你的服务器
### 导入包并设置实例
将以下内容添加到你的 `src/index.ts` 顶部:
```typescript theme={null}
import { McpServer } from "@modelcontextprotocol/sdk/server/mcp.js";
import { StdioServerTransport } from "@modelcontextprotocol/sdk/server/stdio.js";
import { z } from "zod";
const NWS_API_BASE = "https://api.weather.gov";
const USER_AGENT = "weather-app/1.0";
// 创建服务器实例
const server = new McpServer({
name: "weather",
version: "1.0.0",
capabilities: {
resources: {},
tools: {},
},
});
```
### 辅助函数
接下来,让我们添加用于查询和格式化国家气象局 API 数据的辅助函数:
```typescript theme={null}
// 用于发起 NWS API 请求的辅助函数
async function makeNWSRequest(url: string): Promise {
const headers = {
"User-Agent": USER_AGENT,
Accept: "application/geo+json",
};
try {
const response = await fetch(url, { headers });
if (!response.ok) {
throw new Error(`HTTP 错误!状态:${response.status}`);
}
return (await response.json()) as T;
} catch (error) {
console.error("发起 NWS 请求时出错:", error);
return null;
}
}
interface AlertFeature {
properties: {
event?: string;
areaDesc?: string;
severity?: string;
status?: string;
headline?: string;
};
}
// 格式化警报数据
function formatAlert(feature: AlertFeature): string {
const props = feature.properties;
return [
`事件:${props.event || "未知"}`,
`区域:${props.areaDesc || "未知"}`,
`严重等级:${props.severity || "未知"}`,
`状态:${props.status || "未知"}`,
`标题:${props.headline || "无标题"}`,
"---",
].join("\n");
}
interface ForecastPeriod {
name?: string;
temperature?: number;
temperatureUnit?: string;
windSpeed?: string;
windDirection?: string;
shortForecast?: string;
}
interface AlertsResponse {
features: AlertFeature[];
}
interface PointsResponse {
properties: {
forecast?: string;
};
}
interface ForecastResponse {
properties: {
periods: ForecastPeriod[];
};
}
```
### 实现工具执行
工具执行处理器负责实际执行每个工具的逻辑。我们来添加它:
```typescript theme={null}
// 注册天气工具
server.tool(
"get_alerts",
"获取某个州的天气警报",
{
state: z.string().length(2).describe("两位字母的州代码(例如 CA、NY)"),
},
async ({ state }) => {
const stateCode = state.toUpperCase();
const alertsUrl = `${NWS_API_BASE}/alerts?area=${stateCode}`;
const alertsData = await makeNWSRequest(alertsUrl);
if (!alertsData) {
return {
content: [
{
type: "text",
text: "获取警报数据失败",
},
],
};
}
const features = alertsData.features || [];
if (features.length === 0) {
return {
content: [
{
type: "text",
text: `${stateCode} 暂无活跃警报`,
},
],
};
}
const formattedAlerts = features.map(formatAlert);
const alertsText = `${stateCode} 的活跃警报:\n\n${formattedAlerts.join("\n")}`;
return {
content: [
{
type: "text",
text: alertsText,
},
],
};
},
);
server.tool(
"get_forecast",
"获取某个位置的天气预报",
{
latitude: z.number().min(-90).max(90).describe("位置的纬度"),
longitude: z
.number()
.min(-180)
.max(180)
.describe("位置的经度"),
},
async ({ latitude, longitude }) => {
// 获取网格点数据
const pointsUrl = `${NWS_API_BASE}/points/${latitude.toFixed(4)},${longitude.toFixed(4)}`;
const pointsData = await makeNWSRequest(pointsUrl);
if (!pointsData) {
return {
content: [
{
type: "text",
text: `无法获取坐标 ${latitude}, ${longitude} 的网格点数据。该位置可能不受 NWS API 支持(仅支持美国境内位置)。`,
},
],
};
}
const forecastUrl = pointsData.properties?.forecast;
if (!forecastUrl) {
return {
content: [
{
type: "text",
text: "无法从网格点数据获取预报 URL",
},
],
};
}
// 获取预报数据
const forecastData = await makeNWSRequest(forecastUrl);
if (!forecastData) {
return {
content: [
{
type: "text",
text: "获取预报数据失败",
},
],
};
}
const periods = forecastData.properties?.periods || [];
if (periods.length === 0) {
return {
content: [
{
type: "text",
text: "无可用的预报时段",
},
],
};
}
// 格式化预报时段
const formattedForecast = periods.map((period: ForecastPeriod) =>
[
`${period.name || "未知"}:`,
`温度: ${period.temperature || "未知"}°${period.temperatureUnit || "F"}`,
`风力: ${period.windSpeed || "未知"} ${period.windDirection || ""}`,
`${period.shortForecast || "无可用预报"}`,
"---",
].join("\n"),
);
const forecastText = `${latitude}, ${longitude} 的预报:\n\n${formattedForecast.join("\n")}`;
return {
content: [
{
type: "text",
text: forecastText,
},
],
};
},
);
```
### 运行服务器
最后,实现主函数以启动服务器:
```typescript theme={null}
async function main() {
const transport = new StdioServerTransport();
await server.connect(transport);
console.error("天气 MCP 服务器正在 stdio 上运行");
}
main().catch((error) => {
console.error("main() 中的致命错误:", error);
process.exit(1);
});
```
请确保运行 `npm run build` 来构建你的服务器!这是让服务器成功连接的关键步骤。
现在,让我们通过一个现有的 MCP 主机——Claude for Desktop——来测试你的服务器。
## 使用 Claude for Desktop 测试你的服务器
Claude for Desktop 尚未在 Linux 上推出。Linux 用户可以跳转到[构建客户端](/quickstart/client)教程,构建一个连接到刚才所建服务器的 MCP 客户端。
首先,请确认你已安装 Claude for Desktop。[可在此处安装最新版本。](https://claude.ai/download) 如果你已经安装了 Claude for Desktop,**请务必更新到最新版本。**
我们需要为要使用的 MCP 服务器配置 Claude for Desktop。为此,请在文本编辑器中打开 Claude for Desktop 的配置文件 `~/Library/Application Support/Claude/claude_desktop_config.json`。如果该文件不存在,请务必创建它。
例如,如果你已安装 [VS Code](https://code.visualstudio.com/):
```bash macOS/Linux theme={null}
code ~/Library/Application\ Support/Claude/claude_desktop_config.json
```
(文段为空,无需翻译。
```powershell Windows theme={null}
code $env:AppData\Claude\claude_desktop_config.json
```
然后,你需要在 `mcpServers` 键中添加你的服务器。只有当至少一个服务器被正确配置后,Claude for Desktop 中才会出现 MCP 的 UI 元素。
在这个例子中,我们将像这样添加我们的单个天气服务器:
```json macOS/Linux theme={null}
{
"mcpServers": {
"weather": {
"command": "node",
"args": ["/ABSOLUTE/PATH/TO/PARENT/FOLDER/weather/build/index.js"]
}
}
}
```
(输入为空,无需翻译)
```json Windows theme={null}
{
"mcpServers": {
"weather": {
"command": "node",
"args": ["C:\\路径\\到\\父级\\文件夹\\weather\\build\\index.js"]
}
}
}
```
这会告诉 Claude for Desktop:
1. 有一个名为 “weather” 的 MCP 服务器
2. 通过运行 `node /ABSOLUTE/PATH/TO/PARENT/FOLDER/weather/build/index.js` 来启动它
保存文件,然后重启 **Claude for Desktop**。
这是一个基于 Spring AI MCP 自动配置与启动器的快速入门演示。\
如需了解如何手动创建同步与异步 MCP Server,请参阅 [Java SDK Server](/sdk/java/mcp-server) 文档。
让我们开始构建天气服务器!\
[你可以在此处找到我们将要构建的完整代码。](https://github.com/spring-projects/spring-ai-examples/tree/main/model-context-protocol/weather/starter-stdio-server)
更多信息请查看 [MCP Server Boot Starter](https://docs.spring.io/spring-ai/reference/api/mcp/mcp-server-boot-starter-docs.html) 参考文档。\
如需手动实现 MCP Server,请参考 [MCP Server Java SDK 文档](/sdk/java/mcp-server)。
### 在 MCP Server 中记录日志
实现 MCP Server 时,请注意日志处理方式:
**对于基于 STDIO 的服务器:** 永远不要写入标准输出(stdout)。这包括:
* Python 中的 `print()` 语句
* JavaScript 中的 `console.log()`
* Go 中的 `fmt.Println()`
* 其他语言中类似的 stdout 函数
写入 stdout 会破坏 JSON-RPC 消息,导致服务器不可用。
**对于基于 HTTP 的服务器:** 标准输出日志是允许的,因为它不会干扰 HTTP 响应。
### 最佳实践
1. 使用将日志写入 stderr 或文件的日志库。
2. 确保所配置的日志库不会写入 STDOUT。
### 系统要求
* 已安装 Java 17 或更高版本
* [Spring Boot 3.3.x](https://docs.spring.io/spring-boot/installing.html) 或更高版本
### 设置环境
使用 [Spring Initializer](https://start.spring.io/) 初始化项目。
你需要添加以下依赖:
```xml Maven theme={null}
org.springframework.ai
spring-ai-starter-mcp-server
org.springframework
spring-web
```
```groovy Gradle theme={null}
dependencies {
implementation platform("org.springframework.ai:spring-ai-starter-mcp-server")
implementation platform("org.springframework:spring-web")
}
```
然后通过设置应用程序属性来配置您的应用:
```bash application.properties theme={null}
spring.main.bannerMode=off
logging.pattern.console=
```
````markdown theme={null}
# 配置指南
## 系统要求
- **操作系统**:Windows 10 或更高版本,macOS 10.15 或更高版本,Ubuntu 20.04 或更高版本
- **内存**:最少 4 GB RAM,推荐 8 GB 或更多
- **磁盘空间**:至少 2 GB 可用空间
## 安装步骤
1. 下载安装包
```bash
curl -L https://example.com/install.sh | bash
````
2. 运行安装脚本
```bash theme={null}
sudo ./install.sh
```
3. 验证安装
```bash theme={null}
your-app --version
```
## 常见问题
### Q1: 安装失败怎么办?
* 检查网络连接
* 确保已安装所有依赖
* 查看日志文件 `~/.your-app/logs/install.log`
### Q2: 如何卸载?
```bash theme={null}
sudo ./uninstall.sh
```
## 许可证
MIT License — 详见 [LICENSE](LICENSE) 文件。
````
```yaml application.yml
logging:
pattern:
console:
spring:
main:
banner-mode: off
````
[服务器配置属性](https://docs.spring.io/spring-ai/reference/api/mcp/mcp-server-boot-starter-docs.html#_configuration_properties) 文档列出了所有可用的属性。
现在让我们深入构建你的服务器。
## 构建你的服务器
### 天气服务
让我们实现一个 [WeatherService.java](https://github.com/spring-projects/spring-ai-examples/blob/main/model-context-protocol/weather/starter-stdio-server/src/main/java/org/springframework/ai/mcp/sample/server/WeatherService.java),它使用 REST 客户端从国家气象局 API 查询数据:
```java theme={null}
@Service
public class WeatherService {
private final RestClient restClient;
public WeatherService() {
this.restClient = RestClient.builder()
.baseUrl("https://api.weather.gov")
.defaultHeader("Accept", "application/geo+json")
.defaultHeader("User-Agent", "WeatherApiClient/1.0 (your@email.com)")
.build();
}
@Tool(description = "获取指定经纬度的天气预报")
public String getWeatherForecastByLocation(
double latitude, // 纬度坐标
double longitude // 经度坐标
) {
// 返回详细预报,包括:
// - 温度及单位
// - 风速及风向
// - 详细预报描述
}
@Tool(description = "获取美国某州的天气警报")
public String getAlerts(
@ToolParam(description = "两位字母的美国州代码,例如 CA、NY") String state
) {
// 返回活跃警报,包括:
// - 事件类型
// - 受影响区域
// - 严重程度
// - 描述
// - 安全指示
}
// ......
}
```
`@Service` 注解会自动将服务注册到你的应用上下文中。\
Spring AI 的 `@Tool` 注解,使得创建和维护 MCP 工具变得简单。
自动配置会自动将这些工具注册到 MCP 服务器。
### 创建你的 Boot 应用
```java theme={null}
@SpringBootApplication
public class McpServerApplication {
public static void main(String[] args) {
SpringApplication.run(McpServerApplication.class, args);
}
@Bean
public ToolCallbackProvider weatherTools(WeatherService weatherService) {
return MethodToolCallbackProvider.builder().toolObjects(weatherService).build();
}
}
```
使用 `MethodToolCallbackProvider` 工具将 `@Tools` 转换为 MCP 服务器可执行回调。
### 运行服务器
最后,让我们构建服务器:
```bash theme={null}
./mvnw clean install
```
这将在 `target` 文件夹中生成一个名为 `mcp-weather-stdio-server-0.0.1-SNAPSHOT.jar` 的文件。
现在,让我们通过现有的 MCP 主机 Claude for Desktop 来测试你的服务器。
## 使用 Claude for Desktop 测试你的服务器
Claude for Desktop 尚未在 Linux 上提供。
首先,请确保你已安装 Claude for Desktop。
[你可以在此处安装最新版本。](https://claude.ai/download) 如果你已经安装了 Claude for Desktop,**请确保它已更新到最新版本。**
我们需要为你要使用的每个 MCP 服务器配置 Claude for Desktop。
为此,请在文本编辑器中打开 Claude for Desktop 应用的配置文件,路径为 `~/Library/Application Support/Claude/claude_desktop_config.json`。
如果该文件不存在,请务必创建它。
例如,如果你已安装 [VS Code](https://code.visualstudio.com/):
```bash macOS/Linux theme={null}
code ~/Library/Application\ Support/Claude/claude_desktop_config.json
```
```powershell Windows theme={null}
code $env:AppData\Claude\claude_desktop_config.json
```
然后,你需要在 `mcpServers` 键中添加你的服务器。\
只有在至少正确配置了一个服务器时,Claude for Desktop 才会显示 MCP 的 UI 元素。
在本例中,我们将像这样添加唯一的天气服务器:
```json macOS/Linux theme={null}
{
"mcpServers": {
"spring-ai-mcp-weather": {
"command": "java",
"args": [
"-Dspring.ai.mcp.server.stdio=true",
"-jar",
"/ABSOLUTE/PATH/TO/PARENT/FOLDER/mcp-weather-stdio-server-0.0.1-SNAPSHOT.jar"
]
}
}
}
```
```json Windows theme={null}
{
"mcpServers": {
"spring-ai-mcp-weather": {
"command": "java",
"args": [
"-Dspring.ai.mcp.server.transport=STDIO",
"-jar",
"C:\\绝对\\路径\\到\\父\\文件夹\\weather\\mcp-weather-stdio-server-0.0.1-SNAPSHOT.jar"
]
}
}
}
```
请确保传入的是服务器所在的绝对路径。
这告诉 Claude for Desktop:
1. 存在一个名为 “my-weather-server” 的 MCP 服务器
2. 通过运行 `java -jar /ABSOLUTE/PATH/TO/PARENT/FOLDER/mcp-weather-stdio-server-0.0.1-SNAPSHOT.jar` 来启动它
保存文件,然后重启 **Claude for Desktop**。
## 使用 Java 客户端测试服务器
### 手动创建 MCP 客户端
使用 `McpClient` 连接到服务器:
```java theme={null}
var stdioParams = ServerParameters.builder("java")
.args("-jar", "/ABSOLUTE/PATH/TO/PARENT/FOLDER/mcp-weather-stdio-server-0.0.1-SNAPSHOT.jar")
.build();
var stdioTransport = new StdioClientTransport(stdioParams);
var mcpClient = McpClient.sync(stdioTransport).build();
mcpClient.initialize();
ListToolsResult toolsList = mcpClient.listTools();
CallToolResult weather = mcpClient.callTool(
new CallToolRequest("getWeatherForecastByLocation",
Map.of("latitude", "47.6062", "longitude", "-122.3321")));
CallToolResult alert = mcpClient.callTool(
new CallToolRequest("getAlerts", Map.of("state", "NY")));
mcpClient.closeGracefully();
```
### 使用 MCP 客户端 Boot Starter
使用 `spring-ai-starter-mcp-client` 依赖项创建一个新的 Boot Starter 应用程序:
```xml theme={null}
org.springframework.ai
spring-ai-starter-mcp-client
```
并将 `spring.ai.mcp.client.stdio.servers-configuration` 属性指向你的 `claude_desktop_config.json` 文件。\
你可以复用现有的 Anthropic Desktop 配置:
```properties theme={null}
spring.ai.mcp.client.stdio.servers-configuration=file:PATH/TO/claude_desktop_config.json
```
当你启动客户端应用程序时,自动配置会根据 claude\_desktop\_config.json 自动创建 MCP 客户端。
更多信息请参阅 [MCP Client Boot Starters](https://docs.spring.io/spring-ai/reference/api/mcp/mcp-server-boot-client-docs.html) 参考文档。
## 更多 Java MCP Server 示例
[starter-webflux-server](https://github.com/spring-projects/spring-ai-examples/tree/main/model-context-protocol/weather/starter-webflux-server) 演示了如何使用 SSE 传输创建 MCP 服务器。\
它展示了如何利用 Spring Boot 的自动配置能力来定义并注册 MCP 工具、资源和提示。
让我们开始构建天气服务器
### 前置知识
本快速入门假设你已熟悉:
* Kotlin
* 像 Claude 这样的 LLM
### 系统要求
* 已安装 Java 17 或更高版本
### 设置环境
首先,如果尚未安装,请安装 `java` 和 `gradle`。\
你可以从 [Oracle 官方 JDK 网站](https://www.oracle.com/java/technologies/downloads/) 下载 `java`。\
验证你的 `java` 安装:
```bash theme={null}
java --version
```
现在,让我们创建并设置你的项目:
```bash macOS/Linux theme={null}
# 为我们的项目创建一个新目录
mkdir weather
cd weather
# 初始化一个新的 Kotlin 项目
gradle init
```
```powershell Windows theme={null}
# 为我们的项目创建一个新目录
md weather
cd weather
# 初始化一个新的 kotlin 项目
gradle init
```
运行 `gradle init` 后,系统会提示你选择创建项目的选项。\
请选择 **Application** 作为项目类型,**Kotlin** 作为编程语言,**Java 17** 作为 Java 版本。
或者,你也可以使用 [IntelliJ IDEA 项目向导](https://kotlinlang.org/docs/jvm-get-started.html) 创建 Kotlin 应用程序。
创建项目后,添加以下依赖:
```kotlin build.gradle.kts theme={null}
val mcpVersion = "0.4.0"
val slf4jVersion = "2.0.9"
val ktorVersion = "3.1.1"
dependencies {
implementation("io.modelcontextprotocol:kotlin-sdk:$mcpVersion")
implementation("org.slf4j:slf4j-nop:$slf4jVersion")
implementation("io.ktor:ktor-client-content-negotiation:$ktorVersion")
implementation("io.ktor:ktor-serialization-kotlinx-json:$ktorVersion")
}
```
```markdown theme={null}
```
```groovy build.gradle theme={null}
def mcpVersion = '0.3.0'
def slf4jVersion = '2.0.9'
def ktorVersion = '3.1.1'
dependencies {
implementation "io.modelcontextprotocol:kotlin-sdk:$mcpVersion"
implementation "org.slf4j:slf4j-nop:$slf4jVersion"
implementation "io.ktor:ktor-client-content-negotiation:$ktorVersion"
implementation "io.ktor:ktor-serialization-kotlinx-json:$ktorVersion"
}
```
同时,在构建脚本中添加以下插件:
```kotlin build.gradle.kts theme={null}
plugins {
kotlin("plugin.serialization") version "你的Kotlin版本"
id("com.github.johnrengelman.shadow") version "8.1.1"
}
```
(原文为空,无需翻译)
```groovy build.gradle theme={null}
plugins {
id 'org.jetbrains.kotlin.plugin.serialization' version '你的Kotlin版本'
id 'com.github.johnrengelman.shadow' version '8.1.1'
}
```
现在让我们开始构建你的服务器。
## 构建你的服务器
### 设置实例
添加一个服务器初始化函数:
```kotlin theme={null}
// 运行 MCP 服务器的主函数
fun `run mcp server`() {
// 使用基本实现创建 MCP 服务器实例
val server = Server(
Implementation(
name = "weather", // 工具名称为 "weather"
version = "1.0.0" // 实现的版本号
),
ServerOptions(
capabilities = ServerCapabilities(tools = ServerCapabilities.Tools(listChanged = true))
)
)
// 使用标准 IO 创建用于服务器通信的传输层
val transport = StdioServerTransport(
System.`in`.asInput(),
System.out.asSink().buffered()
)
runBlocking {
server.connect(transport)
val done = Job()
server.onClose {
done.complete()
}
done.join()
}
}
```
### 天气 API 辅助函数
接下来,我们添加用于查询和转换国家气象局 API 响应的函数和数据类:
```kotlin theme={null}
// 根据给定纬度和经度获取预报信息的扩展函数
suspend fun HttpClient.getForecast(latitude: Double, longitude: Double): List {
val points = this.get("/points/$latitude,$longitude").body()
val forecast = this.get(points.properties.forecast).body()
return forecast.properties.periods.map { period ->
"""
${period.name}:
温度: ${period.temperature} ${period.temperatureUnit}
风力: ${period.windSpeed} ${period.windDirection}
预报: ${period.detailedForecast}
""".trimIndent()
}
}
// 根据给定州获取天气警报的扩展函数
suspend fun HttpClient.getAlerts(state: String): List {
val alerts = this.get("/alerts/active/area/$state").body()
return alerts.features.map { feature ->
"""
事件: ${feature.properties.event}
区域: ${feature.properties.areaDesc}
严重程度: ${feature.properties.severity}
描述: ${feature.properties.description}
建议: ${feature.properties.instruction}
""".trimIndent()
}
}
@Serializable
data class Points(
val properties: Properties
) {
@Serializable
data class Properties(val forecast: String)
}
@Serializable
data class Forecast(
val properties: Properties
) {
@Serializable
data class Properties(val periods: List)
@Serializable
data class Period(
val number: Int, val name: String, val startTime: String, val endTime: String,
val isDaytime: Boolean, val temperature: Int, val temperatureUnit: String,
val temperatureTrend: String, val probabilityOfPrecipitation: JsonObject,
val windSpeed: String, val windDirection: String,
val shortForecast: String, val detailedForecast: String,
)
}
@Serializable
data class Alert(
val features: List
) {
@Serializable
data class Feature(
val properties: Properties
)
@Serializable
data class Properties(
val event: String, val areaDesc: String, val severity: String,
val description: String, val instruction: String?,
)
}
```
### 实现工具执行
工具执行处理器负责实际执行每个工具的逻辑。我们来添加它:
```kotlin theme={null}
// 创建一个带有默认请求配置和 JSON 内容协商的 HTTP 客户端
val httpClient = HttpClient {
defaultRequest {
url("https://api.weather.gov")
headers {
append("Accept", "application/geo+json")
append("User-Agent", "WeatherApiClient/1.0")
}
contentType(ContentType.Application.Json)
}
// 安装内容协商插件以进行 JSON 序列化/反序列化
install(ContentNegotiation) { json(Json { ignoreUnknownKeys = true }) }
}
// 注册一个按州获取天气警报的工具
server.addTool(
name = "get_alerts",
description = """
获取美国某州的天气警报。输入为两位字母的美国州代码(例如 CA、NY)
""".trimIndent(),
inputSchema = Tool.Input(
properties = buildJsonObject {
putJsonObject("state") {
put("type", "string")
put("description", "两位字母的美国州代码(例如 CA、NY)")
}
},
required = listOf("state")
)
) { request ->
val state = request.arguments["state"]?.jsonPrimitive?.content
if (state == null) {
return@addTool CallToolResult(
content = listOf(TextContent("必须提供 'state' 参数。"))
)
}
val alerts = httpClient.getAlerts(state)
CallToolResult(content = alerts.map { TextContent(it) })
}
// 注册一个按经纬度获取天气预报的工具
server.addTool(
name = "get_forecast",
description = """
获取指定经纬度的天气预报
""".trimIndent(),
inputSchema = Tool.Input(
properties = buildJsonObject {
putJsonObject("latitude") { put("type", "number") }
putJsonObject("longitude") { put("type", "number") }
},
required = listOf("latitude", "longitude")
)
) { request ->
val latitude = request.arguments["latitude"]?.jsonPrimitive?.doubleOrNull
val longitude = request.arguments["longitude"]?.jsonPrimitive?.doubleOrNull
if (latitude == null || longitude == null) {
return@addTool CallToolResult(
content = listOf(TextContent("必须提供 'latitude' 和 'longitude' 参数。"))
)
}
val forecast = httpClient.getForecast(latitude, longitude)
CallToolResult(content = forecast.map { TextContent(it) })
}
```
### 运行服务器
最后,实现主函数以启动服务器:
```kotlin theme={null}
fun main() = `运行 mcp 服务器`()
```
请务必运行 `./gradlew build` 来构建你的服务器。这是让服务器能够连接的一个非常重要的步骤。
现在,让我们通过现有的 MCP 主机——Claude for Desktop 来测试你的服务器。
## 使用 Claude for Desktop 测试你的服务器
Claude for Desktop 尚未在 Linux 上推出。Linux 用户可以继续阅读 [构建客户端](/quickstart/client) 教程,构建一个连接到我们刚刚创建的服务器的 MCP 客户端。
首先,请确保你已安装 Claude for Desktop。[可在此处安装最新版本](https://claude.ai/download)。如果你已经安装了 Claude for Desktop,**请确保它已更新到最新版本。**
我们需要为要使用的每个 MCP 服务器配置 Claude for Desktop。
为此,请用文本编辑器打开 Claude for Desktop 的配置文件:`~/Library/Application Support/Claude/claude_desktop_config.json`。
如果该文件不存在,请务必创建它。
例如,如果你已安装 [VS Code](https://code.visualstudio.com/):
```bash macOS/Linux theme={null}
code ~/Library/Application\ Support/Claude/claude_desktop_config.json
```
(原文为空,无需翻译)
```powershell Windows theme={null}
code $env:AppData\Claude\claude_desktop_config.json
```
接下来,你需要在 `mcpServers` 键中添加你的服务器。\
只有当至少一个服务器被正确配置后,Claude for Desktop 才会显示 MCP 的 UI 元素。
在这个例子中,我们将像这样添加单个天气服务器:
```json macOS/Linux theme={null}
{
"mcpServers": {
"weather": {
"command": "java",
"args": [
"-jar",
"/ABSOLUTE/PATH/TO/PARENT/FOLDER/weather/build/libs/weather-0.1.0-all.jar"
]
}
}
}
```
````markdown theme={null}
# 快速入门
欢迎使用 **AwesomeLib**!本指南将帮助你在 5 分钟内完成安装并运行第一个示例。
## 安装
### 系统要求
- Python 3.8+
- 操作系统:Windows / macOS / Linux
### 使用 pip 安装
```bash
pip install awesome-lib
````
### 验证安装
```python theme={null}
import awesome_lib
print(awesome_lib.__version__)
```
## 第一个示例
1. 创建文件 `hello.py`。
2. 粘贴以下代码:
```python theme={null}
from awesome_lib import greet
print(greet("World"))
```
3. 在终端运行:
```bash theme={null}
python hello.py
```
如果看到输出 `Hello, World!`,说明一切就绪!
## 下一步
* 阅读 [完整文档](https://awesome-lib.readthedocs.io)
* 浏览 [示例库](https://github.com/awesome-lib/examples)
````
```json Windows
{
"mcpServers": {
"weather": {
"command": "java",
"args": [
"-jar",
"C:\\路径\\到\\父\\文件夹\\weather\\build\\libs\\weather-0.1.0-all.jar"
]
}
}
}
````
这告诉 Claude for Desktop:
1. 有一个名为 "weather" 的 MCP 服务器
2. 通过运行 `java -jar /ABSOLUTE/PATH/TO/PARENT/FOLDER/weather/build/libs/weather-0.1.0-all.jar` 来启动它
保存文件,然后重启 **Claude for Desktop**。
让我们开始构建我们的天气服务器
### 前置知识
本快速入门假设你熟悉以下内容:
* C#
* 像 Claude 这样的 LLM
* .NET 8 或更高版本
### MCP 服务器中的日志记录
在实现 MCP 服务器时,请小心处理日志记录:
**对于基于 STDIO 的服务器:** 永远不要写入标准输出(stdout)。这包括:
* Python 中的 `print()` 语句
* JavaScript 中的 `console.log()`
* Go 中的 `fmt.Println()`
* 其他语言中类似的 stdout 函数
写入 stdout 会破坏 JSON-RPC 消息并导致服务器中断。
**对于基于 HTTP 的服务器:** 标准输出日志记录是可以的,因为它不会干扰 HTTP 响应。
### 最佳实践
1. 使用写入 stderr 或文件的日志库
### 系统要求
* 已安装 [.NET 8 SDK](https://dotnet.microsoft.com/download/dotnet/8.0) 或更高版本。
### 设置你的环境
首先,如果你还没有安装 `dotnet`,让我们先安装它。你可以从 [官方 Microsoft .NET 网站](https://dotnet.microsoft.com/download/) 下载 `dotnet`。验证你的 `dotnet` 安装:
```bash theme={null}
dotnet --version
```
现在,我们来创建并设置你的项目:
```bash macOS/Linux theme={null}
# 为我们的项目创建一个新目录
mkdir weather
cd weather
# 初始化一个新的 C# 项目
dotnet new console
```
(原文为空,无需翻译)
```powershell Windows theme={null}
# 为我们的项目创建一个新目录
mkdir weather
cd weather
# 初始化一个新的 C# 项目
dotnet new console
```
运行 `dotnet new console` 后,你将获得一个全新的 C# 项目。\
你可以在你喜欢的 IDE(如 [Visual Studio](https://visualstudio.microsoft.com/) 或 [Rider](https://www.jetbrains.com/rider/))中打开该项目。\
或者,你也可以使用 [Visual Studio 项目向导](https://learn.microsoft.com/zh-cn/visualstudio/get-started/csharp/tutorial-console?view=vs-2022) 来创建 C# 应用程序。\
创建项目后,请为 Model Context Protocol SDK 及其托管添加 NuGet 包:
```bash theme={null}
# 添加 Model Context Protocol SDK NuGet 包
dotnet add package ModelContextProtocol --prerelease
# 添加 .NET Hosting NuGet 包
dotnet add package Microsoft.Extensions.Hosting
```
现在让我们开始构建你的服务器。
## 构建你的服务器
在你的项目中打开 `Program.cs` 文件,并将其内容替换为以下代码:
```csharp theme={null}
using Microsoft.Extensions.DependencyInjection;
using Microsoft.Extensions.Hosting;
using ModelContextProtocol;
using System.Net.Http.Headers;
var builder = Host.CreateEmptyApplicationBuilder(settings: null);
builder.Services.AddMcpServer()
.WithStdioServerTransport()
.WithToolsFromAssembly();
builder.Services.AddSingleton(_ =>
{
var client = new HttpClient() { BaseAddress = new Uri("https://api.weather.gov") };
client.DefaultRequestHeaders.UserAgent.Add(new ProductInfoHeaderValue("weather-tool", "1.0"));
return client;
});
var app = builder.Build();
await app.RunAsync();
```
在创建 `ApplicationHostBuilder` 时,请确保使用 `CreateEmptyApplicationBuilder` 而不是 `CreateDefaultBuilder`。这样可以确保服务器不会向控制台写入任何额外消息。仅在使用 STDIO 传输的服务器中才需要这样做。
这段代码设置了一个基本的控制台应用程序,使用 Model Context Protocol SDK 创建一个带有标准 I/O 传输的 MCP 服务器。
### 天气 API 辅助函数
为 `HttpClient` 创建一个扩展类,以简化 JSON 请求处理:
```csharp theme={null}
using System.Text.Json;
internal static class HttpClientExt
{
public static async Task ReadJsonDocumentAsync(this HttpClient client, string requestUri)
{
using var response = await client.GetAsync(requestUri);
response.EnsureSuccessStatusCode();
return await JsonDocument.ParseAsync(await response.Content.ReadAsStreamAsync());
}
}
```
接下来,定义一个包含工具执行处理程序的类,用于查询并转换来自国家气象局 API 的响应:
```csharp theme={null}
using ModelContextProtocol.Server;
using System.ComponentModel;
using System.Globalization;
using System.Text.Json;
namespace QuickstartWeatherServer.Tools;
[McpServerToolType]
public static class WeatherTools
{
[McpServerTool, Description("获取美国某州的天气警报。")]
public static async Task GetAlerts(
HttpClient client,
[Description("要获取警报的美国州。")] string state)
{
using var jsonDocument = await client.ReadJsonDocumentAsync($"/alerts/active/area/{state}");
var jsonElement = jsonDocument.RootElement;
var alerts = jsonElement.GetProperty("features").EnumerateArray();
if (!alerts.Any())
{
return "该州暂无活跃警报。";
}
return string.Join("\n--\n", alerts.Select(alert =>
{
JsonElement properties = alert.GetProperty("properties");
return $"""
事件: {properties.GetProperty("event").GetString()}
区域: {properties.GetProperty("areaDesc").GetString()}
严重程度: {properties.GetProperty("severity").GetString()}
描述: {properties.GetProperty("description").GetString()}
指示: {properties.GetProperty("instruction").GetString()}
""";
}));
}
[McpServerTool, Description("获取某位置的天气预报。")]
public static async Task GetForecast(
HttpClient client,
[Description("位置的纬度。")] double latitude,
[Description("位置的经度。")] double longitude)
{
var pointUrl = string.Create(CultureInfo.InvariantCulture, $"/points/{latitude},{longitude}");
using var jsonDocument = await client.ReadJsonDocumentAsync(pointUrl);
var forecastUrl = jsonDocument.RootElement.GetProperty("properties").GetProperty("forecast").GetString()
?? throw new Exception($"{client.BaseAddress}points/{latitude},{longitude} 未提供预报 URL");
using var forecastDocument = await client.ReadJsonDocumentAsync(forecastUrl);
var periods = forecastDocument.RootElement.GetProperty("properties").GetProperty("periods").EnumerateArray();
return string.Join("\n---\n", periods.Select(period => $"""
{period.GetProperty("name").GetString()}
温度: {period.GetProperty("temperature").GetInt32()}°F
风力: {period.GetProperty("windSpeed").GetString()} {period.GetProperty("windDirection").GetString()}
预报: {period.GetProperty("detailedForecast").GetString()}
"""));
}
}
```
### 运行服务器
最后,使用以下命令运行服务器:
```bash theme={null}
dotnet run
```
这将启动服务器并通过标准输入/输出监听传入的请求。
## 使用 Claude for Desktop 测试你的服务器
Claude for Desktop 尚未在 Linux 上提供。Linux 用户可以跳转到 [构建客户端](/quickstart/client) 教程,构建一个 MCP 客户端来连接我们刚刚创建的服务器。
首先,请确保你已安装 Claude for Desktop。[你可以在此处安装最新版本](https://claude.ai/download)。如果你已经安装了 Claude for Desktop,**请确保更新到最新版本。**
我们需要为要使用的 MCP 服务器配置 Claude for Desktop。为此,请在文本编辑器中打开你的 Claude for Desktop 应用配置文件 `~/Library/Application Support/Claude/claude_desktop_config.json`。如果该文件不存在,请务必创建它。
例如,如果你已安装 [VS Code](https://code.visualstudio.com/):
```bash macOS/Linux theme={null}
code ~/Library/Application\ Support/Claude/claude_desktop_config.json
```
````markdown theme={null}
# 快速开始指南
## 1. 安装
### 使用包管理器
```bash
npm install awesome-package
````
### 手动下载
1. 访问 [发布页面](https://github.com/user/repo/releases)。
2. 下载适用于您平台的压缩包。
3. 解压并将二进制文件移动到您的 `PATH` 中。
## 2. 配置
创建一个 `config.json` 文件:
```json theme={null}
{
"port": 3000,
"debug": true
}
```
## 3. 运行
### 启动服务器
```bash theme={null}
awesome-package --config config.json
```
### 验证
访问 `http://localhost:3000/health` 并确认返回 `{"status":"ok"}`。
## 4. 故障排除
| 问题 | 解决方案 |
| ------ | ---------------------------- |
| 端口已被占用 | 在 `config.json` 中修改 `port` 值 |
| 权限被拒绝 | 以管理员身份运行或使用 `sudo` |
````
```powershell Windows
code $env:AppData\Claude\claude_desktop_config.json
````
接下来,你需要在 `mcpServers` 键中添加你的服务器。只有当至少一个服务器被正确配置时,Claude for Desktop 中的 MCP UI 元素才会显示出来。\
在此示例中,我们像这样添加单个天气服务器:
```json macOS/Linux theme={null}
{
"mcpServers": {
"weather": {
"command": "dotnet",
"args": ["run", "--project", "/ABSOLUTE/PATH/TO/PROJECT", "--no-build"]
}
}
}
```
(原文为空,无需翻译)
```json Windows theme={null}
{
"mcpServers": {
"weather": {
"command": "dotnet",
"args": [
"run",
"--project",
"C:\\绝对\\路径\\到\\项目",
"--no-build"
]
}
}
}
```
这会告诉 Claude for Desktop:
1. 有一个名为 “weather” 的 MCP 服务器
2. 通过运行 `dotnet run /ABSOLUTE/PATH/TO/PROJECT` 来启动它\
保存文件并重启 **Claude for Desktop**。
### 通过命令测试
让我们确认 Claude for Desktop 已经识别到我们在 `weather` 服务器中暴露的两个工具。你可以通过寻找 “Search and tools”
服务器可以连接到任何客户端。此处我们选择 Claude for Desktop 以简化流程,但我们也提供了[构建自有客户端](/quickstart/client)的指南,以及[其他客户端列表](/clients)。
### MCP 核心概念
MCP 服务器可提供三种主要能力:
1. **资源**:可被客户端读取的类文件数据(如 API 响应或文件内容)
2. **工具**:可由 LLM 调用的函数(需用户批准)
3. **提示**:帮助用户完成特定任务的预编写模板
本教程主要聚焦于工具。
让我们开始构建天气服务器
### 前置知识
本快速入门假设你已熟悉:
* Python
* Claude 等 LLM
### MCP 服务器中的日志记录
在实现 MCP 服务器时,请谨慎处理日志记录:
**对于基于 STDIO 的服务器:** 切勿写入标准输出(stdout)。这包括:
* Python 中的 `print()` 语句
* JavaScript 中的 `console.log()`
* Go 中的 `fmt.Println()`
* 其他语言中类似的 stdout 函数
写入 stdout 会破坏 JSON-RPC 消息,导致服务器失效。
**对于基于 HTTP 的服务器:** 标准输出日志记录是可接受的,因为它不会干扰 HTTP 响应。
### 最佳实践
1. 使用写入 stderr 或文件的日志库。
### 快速示例
```python theme={null}
# ❌ 不好的做法(STDIO)
print("正在处理请求")
# ✅ 好的做法(STDIO)
import logging
logging.info("正在处理请求")
```
### 系统要求
* 已安装 Python 3.10 或更高版本。
* 必须使用 Python MCP SDK 1.2.0 或更高版本。
### 配置环境
首先,安装 `uv` 并设置我们的 Python 项目及环境:
```bash macOS/Linux theme={null}
curl -LsSf https://astral.sh/uv/install.sh | sh
```
(原文为空,无需翻译)
```powershell Windows theme={null}
powershell -ExecutionPolicy ByPass -c "irm https://astral.sh/uv/install.ps1 | iex"
```
之后请务必重新启动终端,以确保系统能识别 `uv` 命令。
现在,我们来创建并设置项目:
```bash macOS/Linux theme={null}
# 为项目创建新目录
uv init weather
cd weather
# 创建虚拟环境并激活
uv venv
source .venv/bin/activate
# 安装依赖
uv add "mcp[cli]" httpx
# 创建服务器文件
touch weather.py
```
(由于您未提供需要翻译的Markdown文本,因此此处无可翻译内容。请提供需要翻译的文本,我将立即为您翻译。)
```powershell Windows theme={null}
# 为我们的项目创建一个新目录
uv init weather
cd weather
# 创建虚拟环境并激活
uv venv
.venv\Scripts\activate
# 安装依赖
uv add mcp[cli] httpx
# 创建我们的服务器文件
new-item weather.py
```
现在让我们深入构建你的服务器。
## 构建你的服务器
### 导入包并设置实例
将这些内容添加到你的 `weather.py` 顶部:
```python theme={null}
from typing import Any
import httpx
from mcp.server.fastmcp import FastMCP
# 初始化 FastMCP 服务器
mcp = FastMCP("weather")
# 常量
NWS_API_BASE = "https://api.weather.gov"
USER_AGENT = "weather-app/1.0"
```
FastMCP 类利用 Python 的类型提示和文档字符串自动生成工具定义,使得创建和维护 MCP 工具变得简单。
### 辅助函数
接下来,我们添加用于查询并格式化来自国家气象局 API 数据的辅助函数:
```python theme={null}
async def make_nws_request(url: str) -> dict[str, Any] | None:
"""向 NWS API 发起请求,并附带适当的错误处理。"""
headers = {
"User-Agent": USER_AGENT,
"Accept": "application/geo+json"
}
async with httpx.AsyncClient() as client:
try:
response = await client.get(url, headers=headers, timeout=30.0)
response.raise_for_status()
return response.json()
except Exception:
return None
def format_alert(feature: dict) -> str:
"""将警报要素格式化为可读字符串。"""
props = feature["properties"]
return f"""
事件: {props.get('event', '未知')}
区域: {props.get('areaDesc', '未知')}
严重程度: {props.get('severity', '未知')}
描述: {props.get('description', '无可用描述')}
指示: {props.get('instruction', '未提供具体指示')}
"""
```
### 实现工具执行
工具执行处理器负责实际执行每个工具的逻辑。我们来添加它:
```python theme={null}
@mcp.tool()
async def get_alerts(state: str) -> str:
"""获取美国某州的天气预警。
Args:
state: 两位字母的美国州代码(例如 CA、NY)
"""
url = f"{NWS_API_BASE}/alerts/active/area/{state}"
data = await make_nws_request(url)
if not data or "features" not in data:
return "无法获取预警或未找到预警。"
if not data["features"]:
return "该州暂无活跃预警。"
alerts = [format_alert(feature) for feature in data["features"]]
return "\n---\n".join(alerts)
@mcp.tool()
async def get_forecast(latitude: float, longitude: float) -> str:
"""获取某地点的天气预报。
Args:
latitude: 地点的纬度
longitude: 地点的经度
"""
# 首先获取预报网格端点
points_url = f"{NWS_API_BASE}/points/{latitude},{longitude}"
points_data = await make_nws_request(points_url)
if not points_data:
return "无法获取该地点的预报数据。"
# 从 points 响应中获取预报 URL
forecast_url = points_data["properties"]["forecast"]
forecast_data = await make_nws_request(forecast_url)
if not forecast_data:
return "无法获取详细预报。"
# 将时段格式化为可读预报
periods = forecast_data["properties"]["periods"]
forecasts = []
for period in periods[:5]: # 仅显示接下来 5 个时段
forecast = f"""
{period['name']}:
温度: {period['temperature']}°{period['temperatureUnit']}
风力: {period['windSpeed']} {period['windDirection']}
预报: {period['detailedForecast']}
"""
forecasts.append(forecast)
return "\n---\n".join(forecasts)
```
### 运行服务器
最后,让我们初始化并启动服务器:
```python theme={null}
if __name__ == "__main__":
# 初始化并运行服务器
mcp.run(transport='stdio')
```
你的服务器已经完成!运行 `uv run weather.py` 来启动 MCP 服务器,它将监听来自 MCP 主机的消息。
现在,让我们用现有的 MCP 主机——Claude for Desktop——来测试你的服务器。
## 使用 Claude for Desktop 测试你的服务器
Claude for Desktop 尚未在 Linux 上推出。Linux 用户可以跳转到[构建客户端](/quickstart/client)教程,构建一个连接到刚才所建服务器的 MCP 客户端。
首先,请确保你已安装 Claude for Desktop。[可在此处安装最新版本。](https://claude.ai/download) 如果你已经安装了 Claude for Desktop,**请确保更新到最新版本。**
我们需要为要使用的任何 MCP 服务器配置 Claude for Desktop。为此,请在文本编辑器中打开 Claude for Desktop 应用配置:`~/Library/Application Support/Claude/claude_desktop_config.json`。如果该文件不存在,请务必创建它。
例如,如果你已安装 [VS Code](https://code.visualstudio.com/):
```bash macOS/Linux theme={null}
code ~/Library/Application\ Support/Claude/claude_desktop_config.json
```
# 使用指南
## 安装
### 系统要求
* Python 3.8 或更高版本
* pip 包管理器
* 至少 2 GB 可用磁盘空间
### 安装步骤
1. 克隆仓库:
```bash theme={null}
git clone https://github.com/example/project.git
cd project
```
2. 创建并激活虚拟环境:
```bash theme={null}
python -m venv venv
source venv/bin/activate # Windows 使用 venv\Scripts\activate
```
3. 安装依赖:
```bash theme={null}
pip install -r requirements.txt
```
## 快速开始
### 启动服务
```bash theme={null}
python main.py
```
默认情况下,服务将在 `http://localhost:8000` 启动。
### 测试端点
```bash theme={null}
curl -X GET http://localhost:8000/health
```
预期响应:
```json theme={null}
{"status": "ok"}
```
## 配置
配置文件位于 `config/settings.yaml`:
```yaml theme={null}
server:
host: "0.0.0.0"
port: 8000
database:
url: "sqlite:///app.db"
```
## 故障排查
### 常见问题
| 问题 | 可能原因 | 解决方案 |
| ------- | ------ | ----------------------- |
| 启动失败 | 端口被占用 | 修改 `settings.yaml` 中的端口 |
| 数据库连接错误 | 路径错误 | 检查 `database.url` 配置 |
| 权限错误 | 文件权限不足 | 运行 `chmod +x main.py` |
### 获取帮助
* 查看 [FAQ](docs/faq.md)
* 在 [讨论区](https://github.com/example/project/discussions) 提问
* 提交 [Issue](https://github.com/example/project/issues)
```powershell Windows theme={null}
code $env:AppData\Claude\claude_desktop_config.json
```
接下来在 `mcpServers` 键里添加服务器。只有当至少一个服务器正确配置后,MCP 的 UI 元素才会在 Claude for Desktop 里出现。
此时我们像这样添加单个天气服务器:
```json macOS/Linux theme={null}
{
"mcpServers": {
"weather": {
"command": "uv",
"args": [
"--directory",
"/ABSOLUTE/PATH/TO/PARENT/FOLDER/weather",
"run",
"weather.py"
]
}
}
}
```
(由于您没有提供需要翻译的文本,这里为空)
```json Windows theme={null}
{
"mcpServers": {
"weather": {
"command": "uv",
"args": [
"--directory",
"C:\\ABSOLUTE\\PATH\\TO\\PARENT\\FOLDER\\weather",
"run",
"weather.py"
]
}
}
}
```
你可能需要在 `command` 字段中填写 `uv` 可执行文件的完整路径。你可以通过运行 `which uv`(macOS/Linux)或 `where uv`(Windows)来获取。
请确保传入服务器的绝对路径。你可以通过运行 `pwd`(macOS/Linux)或 `cd`(Windows 命令提示符)来获取。在 Windows 上,请记得在 JSON 路径中使用双反斜杠(`\\`)或正斜杠(`/`)。
这告诉 Claude for Desktop:
1. 有一个名为 “weather” 的 MCP 服务器
2. 通过运行 `uv --directory /ABSOLUTE/PATH/TO/PARENT/FOLDER/weather run weather.py` 来启动它
保存文件,并重启 **Claude for Desktop**。
让我们开始构建天气服务器
### 前置知识
本快速入门假设你已熟悉:
* TypeScript
* 像 Claude 这样的 LLM
### MCP 服务器中的日志记录
实现 MCP 服务器时,请谨慎处理日志:
**对于基于 STDIO 的服务器:** 永远不要写入标准输出(stdout)。这包括:
* Python 中的 `print()` 语句
* JavaScript 中的 `console.log()`
* Go 中的 `fmt.Println()`
* 其他语言中类似的 stdout 函数
写入 stdout 会破坏 JSON-RPC 消息并使服务器崩溃。
**对于基于 HTTP 的服务器:** 标准输出日志记录是可以的,因为它不会干扰 HTTP 响应。
### 最佳实践
1. 使用写入 stderr 或文件的日志库,例如 Python 中的 `logging`。
2. 对于 JavaScript,尤其要小心 —— `console.log()` 默认写入 stdout
### 快速示例
```javascript theme={null}
// ❌ 错误(STDIO)
console.log("Server started");
// ✅ 正确(STDIO)
console.error("Server started"); // stderr 是安全的
```
### 系统要求
对于 TypeScript,请确保已安装最新版本的 Node。
### 配置环境
首先,如果尚未安装 Node.js 和 npm,请先进行安装。你可以从 [nodejs.org](https://nodejs.org/) 下载。
验证你的 Node.js 安装:
```bash theme={null}
node --version
npm --version
```
在本教程中,你需要 Node.js 16 或更高版本。
现在,让我们创建并设置我们的项目:
```bash macOS/Linux theme={null}
# 为我们的项目创建一个新目录
mkdir weather
cd weather
# 初始化一个新的 npm 项目
npm init -y
# 安装依赖
npm install @modelcontextprotocol/sdk zod@3
npm install -D @types/node typescript
# 创建我们的文件
mkdir src
touch src/index.ts
```
(原文为空,无内容需要翻译)
```powershell Windows theme={null}
# 为我们的项目创建一个新目录
md weather
cd weather
# 初始化一个新的 npm 项目
npm init -y
# 安装依赖
npm install @modelcontextprotocol/sdk zod@3
npm install -D @types/node typescript
# 创建我们的文件
md src
new-item src\index.ts
```
更新你的 package.json,添加 `"type": "module"` 和一个 build 脚本:
```json package.json theme={null}
{
"type": "module",
"bin": {
"weather": "./build/index.js"
},
"scripts": {
"build": "tsc && chmod 755 build/index.js"
},
"files": ["build"]
}
```
在项目根目录下创建一个 `tsconfig.json`:
```json tsconfig.json theme={null}
{
"compilerOptions": {
"target": "ES2022",
"module": "Node16",
"moduleResolution": "Node16",
"outDir": "./build",
"rootDir": "./src",
"strict": true,
"esModuleInterop": true,
"skipLibCheck": true,
"forceConsistentCasingInFileNames": true
},
"include": ["src/**/*"],
"exclude": ["node_modules"]
}
```
现在让我们深入构建你的服务器。
## 构建你的服务器
### 导入包并设置实例
将以下内容添加到你的 `src/index.ts` 顶部:
```typescript theme={null}
import { McpServer } from "@modelcontextprotocol/sdk/server/mcp.js";
import { StdioServerTransport } from "@modelcontextprotocol/sdk/server/stdio.js";
import { z } from "zod";
const NWS_API_BASE = "https://api.weather.gov";
const USER_AGENT = "weather-app/1.0";
// 创建服务器实例
const server = new McpServer({
name: "weather",
version: "1.0.0",
capabilities: {
resources: {},
tools: {},
},
});
```
### 辅助函数
接下来,让我们添加用于查询和格式化国家气象局 API 数据的辅助函数:
```typescript theme={null}
// 用于发起 NWS API 请求的辅助函数
async function makeNWSRequest(url: string): Promise {
const headers = {
"User-Agent": USER_AGENT,
Accept: "application/geo+json",
};
try {
const response = await fetch(url, { headers });
if (!response.ok) {
throw new Error(`HTTP 错误!状态:${response.status}`);
}
return (await response.json()) as T;
} catch (error) {
console.error("发起 NWS 请求时出错:", error);
return null;
}
}
interface AlertFeature {
properties: {
event?: string;
areaDesc?: string;
severity?: string;
status?: string;
headline?: string;
};
}
// 格式化警报数据
function formatAlert(feature: AlertFeature): string {
const props = feature.properties;
return [
`事件:${props.event || "未知"}`,
`区域:${props.areaDesc || "未知"}`,
`严重等级:${props.severity || "未知"}`,
`状态:${props.status || "未知"}`,
`标题:${props.headline || "无标题"}`,
"---",
].join("\n");
}
interface ForecastPeriod {
name?: string;
temperature?: number;
temperatureUnit?: string;
windSpeed?: string;
windDirection?: string;
shortForecast?: string;
}
interface AlertsResponse {
features: AlertFeature[];
}
interface PointsResponse {
properties: {
forecast?: string;
};
}
interface ForecastResponse {
properties: {
periods: ForecastPeriod[];
};
}
```
### 实现工具执行
工具执行处理器负责实际执行每个工具的逻辑。我们来添加它:
```typescript theme={null}
// 注册天气工具
server.tool(
"get_alerts",
"获取某个州的天气警报",
{
state: z.string().length(2).describe("两位字母的州代码(例如 CA、NY)"),
},
async ({ state }) => {
const stateCode = state.toUpperCase();
const alertsUrl = `${NWS_API_BASE}/alerts?area=${stateCode}`;
const alertsData = await makeNWSRequest(alertsUrl);
if (!alertsData) {
return {
content: [
{
type: "text",
text: "获取警报数据失败",
},
],
};
}
const features = alertsData.features || [];
if (features.length === 0) {
return {
content: [
{
type: "text",
text: `${stateCode} 暂无活跃警报`,
},
],
};
}
const formattedAlerts = features.map(formatAlert);
const alertsText = `${stateCode} 的活跃警报:\n\n${formattedAlerts.join("\n")}`;
return {
content: [
{
type: "text",
text: alertsText,
},
],
};
},
);
server.tool(
"get_forecast",
"获取某个位置的天气预报",
{
latitude: z.number().min(-90).max(90).describe("位置的纬度"),
longitude: z
.number()
.min(-180)
.max(180)
.describe("位置的经度"),
},
async ({ latitude, longitude }) => {
// 获取网格点数据
const pointsUrl = `${NWS_API_BASE}/points/${latitude.toFixed(4)},${longitude.toFixed(4)}`;
const pointsData = await makeNWSRequest(pointsUrl);
if (!pointsData) {
return {
content: [
{
type: "text",
text: `无法获取坐标 ${latitude}, ${longitude} 的网格点数据。该位置可能不受 NWS API 支持(仅支持美国境内位置)。`,
},
],
};
}
const forecastUrl = pointsData.properties?.forecast;
if (!forecastUrl) {
return {
content: [
{
type: "text",
text: "无法从网格点数据获取预报 URL",
},
],
};
}
// 获取预报数据
const forecastData = await makeNWSRequest(forecastUrl);
if (!forecastData) {
return {
content: [
{
type: "text",
text: "获取预报数据失败",
},
],
};
}
const periods = forecastData.properties?.periods || [];
if (periods.length === 0) {
return {
content: [
{
type: "text",
text: "无可用的预报时段",
},
],
};
}
// 格式化预报时段
const formattedForecast = periods.map((period: ForecastPeriod) =>
[
`${period.name || "未知"}:`,
`温度: ${period.temperature || "未知"}°${period.temperatureUnit || "F"}`,
`风力: ${period.windSpeed || "未知"} ${period.windDirection || ""}`,
`${period.shortForecast || "无可用预报"}`,
"---",
].join("\n"),
);
const forecastText = `${latitude}, ${longitude} 的预报:\n\n${formattedForecast.join("\n")}`;
return {
content: [
{
type: "text",
text: forecastText,
},
],
};
},
);
```
### 运行服务器
最后,实现主函数以启动服务器:
```typescript theme={null}
async function main() {
const transport = new StdioServerTransport();
await server.connect(transport);
console.error("天气 MCP 服务器正在 stdio 上运行");
}
main().catch((error) => {
console.error("main() 中的致命错误:", error);
process.exit(1);
});
```
请确保运行 `npm run build` 来构建你的服务器!这是让服务器成功连接的关键步骤。
现在,让我们通过一个现有的 MCP 主机——Claude for Desktop——来测试你的服务器。
## 使用 Claude for Desktop 测试你的服务器
Claude for Desktop 尚未在 Linux 上推出。Linux 用户可以跳转到[构建客户端](/quickstart/client)教程,构建一个连接到刚才所建服务器的 MCP 客户端。
首先,请确认你已安装 Claude for Desktop。[可在此处安装最新版本。](https://claude.ai/download) 如果你已经安装了 Claude for Desktop,**请务必更新到最新版本。**
我们需要为要使用的 MCP 服务器配置 Claude for Desktop。为此,请在文本编辑器中打开 Claude for Desktop 的配置文件 `~/Library/Application Support/Claude/claude_desktop_config.json`。如果该文件不存在,请务必创建它。
例如,如果你已安装 [VS Code](https://code.visualstudio.com/):
```bash macOS/Linux theme={null}
code ~/Library/Application\ Support/Claude/claude_desktop_config.json
```
(文段为空,无需翻译。
```powershell Windows theme={null}
code $env:AppData\Claude\claude_desktop_config.json
```
然后,你需要在 `mcpServers` 键中添加你的服务器。只有当至少一个服务器被正确配置后,Claude for Desktop 中才会出现 MCP 的 UI 元素。
在这个例子中,我们将像这样添加我们的单个天气服务器:
```json macOS/Linux theme={null}
{
"mcpServers": {
"weather": {
"command": "node",
"args": ["/ABSOLUTE/PATH/TO/PARENT/FOLDER/weather/build/index.js"]
}
}
}
```
(输入为空,无需翻译)
```json Windows theme={null}
{
"mcpServers": {
"weather": {
"command": "node",
"args": ["C:\\路径\\到\\父级\\文件夹\\weather\\build\\index.js"]
}
}
}
```
这会告诉 Claude for Desktop:
1. 有一个名为 “weather” 的 MCP 服务器
2. 通过运行 `node /ABSOLUTE/PATH/TO/PARENT/FOLDER/weather/build/index.js` 来启动它
保存文件,然后重启 **Claude for Desktop**。
这是一个基于 Spring AI MCP 自动配置与启动器的快速入门演示。\
如需了解如何手动创建同步与异步 MCP Server,请参阅 [Java SDK Server](/sdk/java/mcp-server) 文档。
让我们开始构建天气服务器!\
[你可以在此处找到我们将要构建的完整代码。](https://github.com/spring-projects/spring-ai-examples/tree/main/model-context-protocol/weather/starter-stdio-server)
更多信息请查看 [MCP Server Boot Starter](https://docs.spring.io/spring-ai/reference/api/mcp/mcp-server-boot-starter-docs.html) 参考文档。\
如需手动实现 MCP Server,请参考 [MCP Server Java SDK 文档](/sdk/java/mcp-server)。
### 在 MCP Server 中记录日志
实现 MCP Server 时,请注意日志处理方式:
**对于基于 STDIO 的服务器:** 永远不要写入标准输出(stdout)。这包括:
* Python 中的 `print()` 语句
* JavaScript 中的 `console.log()`
* Go 中的 `fmt.Println()`
* 其他语言中类似的 stdout 函数
写入 stdout 会破坏 JSON-RPC 消息,导致服务器不可用。
**对于基于 HTTP 的服务器:** 标准输出日志是允许的,因为它不会干扰 HTTP 响应。
### 最佳实践
1. 使用将日志写入 stderr 或文件的日志库。
2. 确保所配置的日志库不会写入 STDOUT。
### 系统要求
* 已安装 Java 17 或更高版本
* [Spring Boot 3.3.x](https://docs.spring.io/spring-boot/installing.html) 或更高版本
### 设置环境
使用 [Spring Initializer](https://start.spring.io/) 初始化项目。
你需要添加以下依赖:
```xml Maven theme={null}
org.springframework.ai
spring-ai-starter-mcp-server
org.springframework
spring-web
```
```groovy Gradle theme={null}
dependencies {
implementation platform("org.springframework.ai:spring-ai-starter-mcp-server")
implementation platform("org.springframework:spring-web")
}
```
然后通过设置应用程序属性来配置您的应用:
```bash application.properties theme={null}
spring.main.bannerMode=off
logging.pattern.console=
```
````markdown theme={null}
# 配置指南
## 系统要求
- **操作系统**:Windows 10 或更高版本,macOS 10.15 或更高版本,Ubuntu 20.04 或更高版本
- **内存**:最少 4 GB RAM,推荐 8 GB 或更多
- **磁盘空间**:至少 2 GB 可用空间
## 安装步骤
1. 下载安装包
```bash
curl -L https://example.com/install.sh | bash
````
2. 运行安装脚本
```bash theme={null}
sudo ./install.sh
```
3. 验证安装
```bash theme={null}
your-app --version
```
## 常见问题
### Q1: 安装失败怎么办?
* 检查网络连接
* 确保已安装所有依赖
* 查看日志文件 `~/.your-app/logs/install.log`
### Q2: 如何卸载?
```bash theme={null}
sudo ./uninstall.sh
```
## 许可证
MIT License — 详见 [LICENSE](LICENSE) 文件。
````
```yaml application.yml
logging:
pattern:
console:
spring:
main:
banner-mode: off
````
[服务器配置属性](https://docs.spring.io/spring-ai/reference/api/mcp/mcp-server-boot-starter-docs.html#_configuration_properties) 文档列出了所有可用的属性。
现在让我们深入构建你的服务器。
## 构建你的服务器
### 天气服务
让我们实现一个 [WeatherService.java](https://github.com/spring-projects/spring-ai-examples/blob/main/model-context-protocol/weather/starter-stdio-server/src/main/java/org/springframework/ai/mcp/sample/server/WeatherService.java),它使用 REST 客户端从国家气象局 API 查询数据:
```java theme={null}
@Service
public class WeatherService {
private final RestClient restClient;
public WeatherService() {
this.restClient = RestClient.builder()
.baseUrl("https://api.weather.gov")
.defaultHeader("Accept", "application/geo+json")
.defaultHeader("User-Agent", "WeatherApiClient/1.0 (your@email.com)")
.build();
}
@Tool(description = "获取指定经纬度的天气预报")
public String getWeatherForecastByLocation(
double latitude, // 纬度坐标
double longitude // 经度坐标
) {
// 返回详细预报,包括:
// - 温度及单位
// - 风速及风向
// - 详细预报描述
}
@Tool(description = "获取美国某州的天气警报")
public String getAlerts(
@ToolParam(description = "两位字母的美国州代码,例如 CA、NY") String state
) {
// 返回活跃警报,包括:
// - 事件类型
// - 受影响区域
// - 严重程度
// - 描述
// - 安全指示
}
// ......
}
```
`@Service` 注解会自动将服务注册到你的应用上下文中。\
Spring AI 的 `@Tool` 注解,使得创建和维护 MCP 工具变得简单。
自动配置会自动将这些工具注册到 MCP 服务器。
### 创建你的 Boot 应用
```java theme={null}
@SpringBootApplication
public class McpServerApplication {
public static void main(String[] args) {
SpringApplication.run(McpServerApplication.class, args);
}
@Bean
public ToolCallbackProvider weatherTools(WeatherService weatherService) {
return MethodToolCallbackProvider.builder().toolObjects(weatherService).build();
}
}
```
使用 `MethodToolCallbackProvider` 工具将 `@Tools` 转换为 MCP 服务器可执行回调。
### 运行服务器
最后,让我们构建服务器:
```bash theme={null}
./mvnw clean install
```
这将在 `target` 文件夹中生成一个名为 `mcp-weather-stdio-server-0.0.1-SNAPSHOT.jar` 的文件。
现在,让我们通过现有的 MCP 主机 Claude for Desktop 来测试你的服务器。
## 使用 Claude for Desktop 测试你的服务器
Claude for Desktop 尚未在 Linux 上提供。
首先,请确保你已安装 Claude for Desktop。
[你可以在此处安装最新版本。](https://claude.ai/download) 如果你已经安装了 Claude for Desktop,**请确保它已更新到最新版本。**
我们需要为你要使用的每个 MCP 服务器配置 Claude for Desktop。
为此,请在文本编辑器中打开 Claude for Desktop 应用的配置文件,路径为 `~/Library/Application Support/Claude/claude_desktop_config.json`。
如果该文件不存在,请务必创建它。
例如,如果你已安装 [VS Code](https://code.visualstudio.com/):
```bash macOS/Linux theme={null}
code ~/Library/Application\ Support/Claude/claude_desktop_config.json
```
```powershell Windows theme={null}
code $env:AppData\Claude\claude_desktop_config.json
```
然后,你需要在 `mcpServers` 键中添加你的服务器。\
只有在至少正确配置了一个服务器时,Claude for Desktop 才会显示 MCP 的 UI 元素。
在本例中,我们将像这样添加唯一的天气服务器:
```json macOS/Linux theme={null}
{
"mcpServers": {
"spring-ai-mcp-weather": {
"command": "java",
"args": [
"-Dspring.ai.mcp.server.stdio=true",
"-jar",
"/ABSOLUTE/PATH/TO/PARENT/FOLDER/mcp-weather-stdio-server-0.0.1-SNAPSHOT.jar"
]
}
}
}
```
```json Windows theme={null}
{
"mcpServers": {
"spring-ai-mcp-weather": {
"command": "java",
"args": [
"-Dspring.ai.mcp.server.transport=STDIO",
"-jar",
"C:\\绝对\\路径\\到\\父\\文件夹\\weather\\mcp-weather-stdio-server-0.0.1-SNAPSHOT.jar"
]
}
}
}
```
请确保传入的是服务器所在的绝对路径。
这告诉 Claude for Desktop:
1. 存在一个名为 “my-weather-server” 的 MCP 服务器
2. 通过运行 `java -jar /ABSOLUTE/PATH/TO/PARENT/FOLDER/mcp-weather-stdio-server-0.0.1-SNAPSHOT.jar` 来启动它
保存文件,然后重启 **Claude for Desktop**。
## 使用 Java 客户端测试服务器
### 手动创建 MCP 客户端
使用 `McpClient` 连接到服务器:
```java theme={null}
var stdioParams = ServerParameters.builder("java")
.args("-jar", "/ABSOLUTE/PATH/TO/PARENT/FOLDER/mcp-weather-stdio-server-0.0.1-SNAPSHOT.jar")
.build();
var stdioTransport = new StdioClientTransport(stdioParams);
var mcpClient = McpClient.sync(stdioTransport).build();
mcpClient.initialize();
ListToolsResult toolsList = mcpClient.listTools();
CallToolResult weather = mcpClient.callTool(
new CallToolRequest("getWeatherForecastByLocation",
Map.of("latitude", "47.6062", "longitude", "-122.3321")));
CallToolResult alert = mcpClient.callTool(
new CallToolRequest("getAlerts", Map.of("state", "NY")));
mcpClient.closeGracefully();
```
### 使用 MCP 客户端 Boot Starter
使用 `spring-ai-starter-mcp-client` 依赖项创建一个新的 Boot Starter 应用程序:
```xml theme={null}
org.springframework.ai
spring-ai-starter-mcp-client
```
并将 `spring.ai.mcp.client.stdio.servers-configuration` 属性指向你的 `claude_desktop_config.json` 文件。\
你可以复用现有的 Anthropic Desktop 配置:
```properties theme={null}
spring.ai.mcp.client.stdio.servers-configuration=file:PATH/TO/claude_desktop_config.json
```
当你启动客户端应用程序时,自动配置会根据 claude\_desktop\_config.json 自动创建 MCP 客户端。
更多信息请参阅 [MCP Client Boot Starters](https://docs.spring.io/spring-ai/reference/api/mcp/mcp-server-boot-client-docs.html) 参考文档。
## 更多 Java MCP Server 示例
[starter-webflux-server](https://github.com/spring-projects/spring-ai-examples/tree/main/model-context-protocol/weather/starter-webflux-server) 演示了如何使用 SSE 传输创建 MCP 服务器。\
它展示了如何利用 Spring Boot 的自动配置能力来定义并注册 MCP 工具、资源和提示。
让我们开始构建天气服务器
### 前置知识
本快速入门假设你已熟悉:
* Kotlin
* 像 Claude 这样的 LLM
### 系统要求
* 已安装 Java 17 或更高版本
### 设置环境
首先,如果尚未安装,请安装 `java` 和 `gradle`。\
你可以从 [Oracle 官方 JDK 网站](https://www.oracle.com/java/technologies/downloads/) 下载 `java`。\
验证你的 `java` 安装:
```bash theme={null}
java --version
```
现在,让我们创建并设置你的项目:
```bash macOS/Linux theme={null}
# 为我们的项目创建一个新目录
mkdir weather
cd weather
# 初始化一个新的 Kotlin 项目
gradle init
```
```powershell Windows theme={null}
# 为我们的项目创建一个新目录
md weather
cd weather
# 初始化一个新的 kotlin 项目
gradle init
```
运行 `gradle init` 后,系统会提示你选择创建项目的选项。\
请选择 **Application** 作为项目类型,**Kotlin** 作为编程语言,**Java 17** 作为 Java 版本。
或者,你也可以使用 [IntelliJ IDEA 项目向导](https://kotlinlang.org/docs/jvm-get-started.html) 创建 Kotlin 应用程序。
创建项目后,添加以下依赖:
```kotlin build.gradle.kts theme={null}
val mcpVersion = "0.4.0"
val slf4jVersion = "2.0.9"
val ktorVersion = "3.1.1"
dependencies {
implementation("io.modelcontextprotocol:kotlin-sdk:$mcpVersion")
implementation("org.slf4j:slf4j-nop:$slf4jVersion")
implementation("io.ktor:ktor-client-content-negotiation:$ktorVersion")
implementation("io.ktor:ktor-serialization-kotlinx-json:$ktorVersion")
}
```
```markdown theme={null}
```
```groovy build.gradle theme={null}
def mcpVersion = '0.3.0'
def slf4jVersion = '2.0.9'
def ktorVersion = '3.1.1'
dependencies {
implementation "io.modelcontextprotocol:kotlin-sdk:$mcpVersion"
implementation "org.slf4j:slf4j-nop:$slf4jVersion"
implementation "io.ktor:ktor-client-content-negotiation:$ktorVersion"
implementation "io.ktor:ktor-serialization-kotlinx-json:$ktorVersion"
}
```
同时,在构建脚本中添加以下插件:
```kotlin build.gradle.kts theme={null}
plugins {
kotlin("plugin.serialization") version "你的Kotlin版本"
id("com.github.johnrengelman.shadow") version "8.1.1"
}
```
(原文为空,无需翻译)
```groovy build.gradle theme={null}
plugins {
id 'org.jetbrains.kotlin.plugin.serialization' version '你的Kotlin版本'
id 'com.github.johnrengelman.shadow' version '8.1.1'
}
```
现在让我们开始构建你的服务器。
## 构建你的服务器
### 设置实例
添加一个服务器初始化函数:
```kotlin theme={null}
// 运行 MCP 服务器的主函数
fun `run mcp server`() {
// 使用基本实现创建 MCP 服务器实例
val server = Server(
Implementation(
name = "weather", // 工具名称为 "weather"
version = "1.0.0" // 实现的版本号
),
ServerOptions(
capabilities = ServerCapabilities(tools = ServerCapabilities.Tools(listChanged = true))
)
)
// 使用标准 IO 创建用于服务器通信的传输层
val transport = StdioServerTransport(
System.`in`.asInput(),
System.out.asSink().buffered()
)
runBlocking {
server.connect(transport)
val done = Job()
server.onClose {
done.complete()
}
done.join()
}
}
```
### 天气 API 辅助函数
接下来,我们添加用于查询和转换国家气象局 API 响应的函数和数据类:
```kotlin theme={null}
// 根据给定纬度和经度获取预报信息的扩展函数
suspend fun HttpClient.getForecast(latitude: Double, longitude: Double): List {
val points = this.get("/points/$latitude,$longitude").body()
val forecast = this.get(points.properties.forecast).body()
return forecast.properties.periods.map { period ->
"""
${period.name}:
温度: ${period.temperature} ${period.temperatureUnit}
风力: ${period.windSpeed} ${period.windDirection}
预报: ${period.detailedForecast}
""".trimIndent()
}
}
// 根据给定州获取天气警报的扩展函数
suspend fun HttpClient.getAlerts(state: String): List {
val alerts = this.get("/alerts/active/area/$state").body()
return alerts.features.map { feature ->
"""
事件: ${feature.properties.event}
区域: ${feature.properties.areaDesc}
严重程度: ${feature.properties.severity}
描述: ${feature.properties.description}
建议: ${feature.properties.instruction}
""".trimIndent()
}
}
@Serializable
data class Points(
val properties: Properties
) {
@Serializable
data class Properties(val forecast: String)
}
@Serializable
data class Forecast(
val properties: Properties
) {
@Serializable
data class Properties(val periods: List)
@Serializable
data class Period(
val number: Int, val name: String, val startTime: String, val endTime: String,
val isDaytime: Boolean, val temperature: Int, val temperatureUnit: String,
val temperatureTrend: String, val probabilityOfPrecipitation: JsonObject,
val windSpeed: String, val windDirection: String,
val shortForecast: String, val detailedForecast: String,
)
}
@Serializable
data class Alert(
val features: List
) {
@Serializable
data class Feature(
val properties: Properties
)
@Serializable
data class Properties(
val event: String, val areaDesc: String, val severity: String,
val description: String, val instruction: String?,
)
}
```
### 实现工具执行
工具执行处理器负责实际执行每个工具的逻辑。我们来添加它:
```kotlin theme={null}
// 创建一个带有默认请求配置和 JSON 内容协商的 HTTP 客户端
val httpClient = HttpClient {
defaultRequest {
url("https://api.weather.gov")
headers {
append("Accept", "application/geo+json")
append("User-Agent", "WeatherApiClient/1.0")
}
contentType(ContentType.Application.Json)
}
// 安装内容协商插件以进行 JSON 序列化/反序列化
install(ContentNegotiation) { json(Json { ignoreUnknownKeys = true }) }
}
// 注册一个按州获取天气警报的工具
server.addTool(
name = "get_alerts",
description = """
获取美国某州的天气警报。输入为两位字母的美国州代码(例如 CA、NY)
""".trimIndent(),
inputSchema = Tool.Input(
properties = buildJsonObject {
putJsonObject("state") {
put("type", "string")
put("description", "两位字母的美国州代码(例如 CA、NY)")
}
},
required = listOf("state")
)
) { request ->
val state = request.arguments["state"]?.jsonPrimitive?.content
if (state == null) {
return@addTool CallToolResult(
content = listOf(TextContent("必须提供 'state' 参数。"))
)
}
val alerts = httpClient.getAlerts(state)
CallToolResult(content = alerts.map { TextContent(it) })
}
// 注册一个按经纬度获取天气预报的工具
server.addTool(
name = "get_forecast",
description = """
获取指定经纬度的天气预报
""".trimIndent(),
inputSchema = Tool.Input(
properties = buildJsonObject {
putJsonObject("latitude") { put("type", "number") }
putJsonObject("longitude") { put("type", "number") }
},
required = listOf("latitude", "longitude")
)
) { request ->
val latitude = request.arguments["latitude"]?.jsonPrimitive?.doubleOrNull
val longitude = request.arguments["longitude"]?.jsonPrimitive?.doubleOrNull
if (latitude == null || longitude == null) {
return@addTool CallToolResult(
content = listOf(TextContent("必须提供 'latitude' 和 'longitude' 参数。"))
)
}
val forecast = httpClient.getForecast(latitude, longitude)
CallToolResult(content = forecast.map { TextContent(it) })
}
```
### 运行服务器
最后,实现主函数以启动服务器:
```kotlin theme={null}
fun main() = `运行 mcp 服务器`()
```
请务必运行 `./gradlew build` 来构建你的服务器。这是让服务器能够连接的一个非常重要的步骤。
现在,让我们通过现有的 MCP 主机——Claude for Desktop 来测试你的服务器。
## 使用 Claude for Desktop 测试你的服务器
Claude for Desktop 尚未在 Linux 上推出。Linux 用户可以继续阅读 [构建客户端](/quickstart/client) 教程,构建一个连接到我们刚刚创建的服务器的 MCP 客户端。
首先,请确保你已安装 Claude for Desktop。[可在此处安装最新版本](https://claude.ai/download)。如果你已经安装了 Claude for Desktop,**请确保它已更新到最新版本。**
我们需要为要使用的每个 MCP 服务器配置 Claude for Desktop。
为此,请用文本编辑器打开 Claude for Desktop 的配置文件:`~/Library/Application Support/Claude/claude_desktop_config.json`。
如果该文件不存在,请务必创建它。
例如,如果你已安装 [VS Code](https://code.visualstudio.com/):
```bash macOS/Linux theme={null}
code ~/Library/Application\ Support/Claude/claude_desktop_config.json
```
(原文为空,无需翻译)
```powershell Windows theme={null}
code $env:AppData\Claude\claude_desktop_config.json
```
接下来,你需要在 `mcpServers` 键中添加你的服务器。\
只有当至少一个服务器被正确配置后,Claude for Desktop 才会显示 MCP 的 UI 元素。
在这个例子中,我们将像这样添加单个天气服务器:
```json macOS/Linux theme={null}
{
"mcpServers": {
"weather": {
"command": "java",
"args": [
"-jar",
"/ABSOLUTE/PATH/TO/PARENT/FOLDER/weather/build/libs/weather-0.1.0-all.jar"
]
}
}
}
```
````markdown theme={null}
# 快速入门
欢迎使用 **AwesomeLib**!本指南将帮助你在 5 分钟内完成安装并运行第一个示例。
## 安装
### 系统要求
- Python 3.8+
- 操作系统:Windows / macOS / Linux
### 使用 pip 安装
```bash
pip install awesome-lib
````
### 验证安装
```python theme={null}
import awesome_lib
print(awesome_lib.__version__)
```
## 第一个示例
1. 创建文件 `hello.py`。
2. 粘贴以下代码:
```python theme={null}
from awesome_lib import greet
print(greet("World"))
```
3. 在终端运行:
```bash theme={null}
python hello.py
```
如果看到输出 `Hello, World!`,说明一切就绪!
## 下一步
* 阅读 [完整文档](https://awesome-lib.readthedocs.io)
* 浏览 [示例库](https://github.com/awesome-lib/examples)
````
```json Windows
{
"mcpServers": {
"weather": {
"command": "java",
"args": [
"-jar",
"C:\\路径\\到\\父\\文件夹\\weather\\build\\libs\\weather-0.1.0-all.jar"
]
}
}
}
````
这告诉 Claude for Desktop:
1. 有一个名为 "weather" 的 MCP 服务器
2. 通过运行 `java -jar /ABSOLUTE/PATH/TO/PARENT/FOLDER/weather/build/libs/weather-0.1.0-all.jar` 来启动它
保存文件,然后重启 **Claude for Desktop**。
让我们开始构建我们的天气服务器
### 前置知识
本快速入门假设你熟悉以下内容:
* C#
* 像 Claude 这样的 LLM
* .NET 8 或更高版本
### MCP 服务器中的日志记录
在实现 MCP 服务器时,请小心处理日志记录:
**对于基于 STDIO 的服务器:** 永远不要写入标准输出(stdout)。这包括:
* Python 中的 `print()` 语句
* JavaScript 中的 `console.log()`
* Go 中的 `fmt.Println()`
* 其他语言中类似的 stdout 函数
写入 stdout 会破坏 JSON-RPC 消息并导致服务器中断。
**对于基于 HTTP 的服务器:** 标准输出日志记录是可以的,因为它不会干扰 HTTP 响应。
### 最佳实践
1. 使用写入 stderr 或文件的日志库
### 系统要求
* 已安装 [.NET 8 SDK](https://dotnet.microsoft.com/download/dotnet/8.0) 或更高版本。
### 设置你的环境
首先,如果你还没有安装 `dotnet`,让我们先安装它。你可以从 [官方 Microsoft .NET 网站](https://dotnet.microsoft.com/download/) 下载 `dotnet`。验证你的 `dotnet` 安装:
```bash theme={null}
dotnet --version
```
现在,我们来创建并设置你的项目:
```bash macOS/Linux theme={null}
# 为我们的项目创建一个新目录
mkdir weather
cd weather
# 初始化一个新的 C# 项目
dotnet new console
```
(原文为空,无需翻译)
```powershell Windows theme={null}
# 为我们的项目创建一个新目录
mkdir weather
cd weather
# 初始化一个新的 C# 项目
dotnet new console
```
运行 `dotnet new console` 后,你将获得一个全新的 C# 项目。\
你可以在你喜欢的 IDE(如 [Visual Studio](https://visualstudio.microsoft.com/) 或 [Rider](https://www.jetbrains.com/rider/))中打开该项目。\
或者,你也可以使用 [Visual Studio 项目向导](https://learn.microsoft.com/zh-cn/visualstudio/get-started/csharp/tutorial-console?view=vs-2022) 来创建 C# 应用程序。\
创建项目后,请为 Model Context Protocol SDK 及其托管添加 NuGet 包:
```bash theme={null}
# 添加 Model Context Protocol SDK NuGet 包
dotnet add package ModelContextProtocol --prerelease
# 添加 .NET Hosting NuGet 包
dotnet add package Microsoft.Extensions.Hosting
```
现在让我们开始构建你的服务器。
## 构建你的服务器
在你的项目中打开 `Program.cs` 文件,并将其内容替换为以下代码:
```csharp theme={null}
using Microsoft.Extensions.DependencyInjection;
using Microsoft.Extensions.Hosting;
using ModelContextProtocol;
using System.Net.Http.Headers;
var builder = Host.CreateEmptyApplicationBuilder(settings: null);
builder.Services.AddMcpServer()
.WithStdioServerTransport()
.WithToolsFromAssembly();
builder.Services.AddSingleton(_ =>
{
var client = new HttpClient() { BaseAddress = new Uri("https://api.weather.gov") };
client.DefaultRequestHeaders.UserAgent.Add(new ProductInfoHeaderValue("weather-tool", "1.0"));
return client;
});
var app = builder.Build();
await app.RunAsync();
```
在创建 `ApplicationHostBuilder` 时,请确保使用 `CreateEmptyApplicationBuilder` 而不是 `CreateDefaultBuilder`。这样可以确保服务器不会向控制台写入任何额外消息。仅在使用 STDIO 传输的服务器中才需要这样做。
这段代码设置了一个基本的控制台应用程序,使用 Model Context Protocol SDK 创建一个带有标准 I/O 传输的 MCP 服务器。
### 天气 API 辅助函数
为 `HttpClient` 创建一个扩展类,以简化 JSON 请求处理:
```csharp theme={null}
using System.Text.Json;
internal static class HttpClientExt
{
public static async Task ReadJsonDocumentAsync(this HttpClient client, string requestUri)
{
using var response = await client.GetAsync(requestUri);
response.EnsureSuccessStatusCode();
return await JsonDocument.ParseAsync(await response.Content.ReadAsStreamAsync());
}
}
```
接下来,定义一个包含工具执行处理程序的类,用于查询并转换来自国家气象局 API 的响应:
```csharp theme={null}
using ModelContextProtocol.Server;
using System.ComponentModel;
using System.Globalization;
using System.Text.Json;
namespace QuickstartWeatherServer.Tools;
[McpServerToolType]
public static class WeatherTools
{
[McpServerTool, Description("获取美国某州的天气警报。")]
public static async Task GetAlerts(
HttpClient client,
[Description("要获取警报的美国州。")] string state)
{
using var jsonDocument = await client.ReadJsonDocumentAsync($"/alerts/active/area/{state}");
var jsonElement = jsonDocument.RootElement;
var alerts = jsonElement.GetProperty("features").EnumerateArray();
if (!alerts.Any())
{
return "该州暂无活跃警报。";
}
return string.Join("\n--\n", alerts.Select(alert =>
{
JsonElement properties = alert.GetProperty("properties");
return $"""
事件: {properties.GetProperty("event").GetString()}
区域: {properties.GetProperty("areaDesc").GetString()}
严重程度: {properties.GetProperty("severity").GetString()}
描述: {properties.GetProperty("description").GetString()}
指示: {properties.GetProperty("instruction").GetString()}
""";
}));
}
[McpServerTool, Description("获取某位置的天气预报。")]
public static async Task GetForecast(
HttpClient client,
[Description("位置的纬度。")] double latitude,
[Description("位置的经度。")] double longitude)
{
var pointUrl = string.Create(CultureInfo.InvariantCulture, $"/points/{latitude},{longitude}");
using var jsonDocument = await client.ReadJsonDocumentAsync(pointUrl);
var forecastUrl = jsonDocument.RootElement.GetProperty("properties").GetProperty("forecast").GetString()
?? throw new Exception($"{client.BaseAddress}points/{latitude},{longitude} 未提供预报 URL");
using var forecastDocument = await client.ReadJsonDocumentAsync(forecastUrl);
var periods = forecastDocument.RootElement.GetProperty("properties").GetProperty("periods").EnumerateArray();
return string.Join("\n---\n", periods.Select(period => $"""
{period.GetProperty("name").GetString()}
温度: {period.GetProperty("temperature").GetInt32()}°F
风力: {period.GetProperty("windSpeed").GetString()} {period.GetProperty("windDirection").GetString()}
预报: {period.GetProperty("detailedForecast").GetString()}
"""));
}
}
```
### 运行服务器
最后,使用以下命令运行服务器:
```bash theme={null}
dotnet run
```
这将启动服务器并通过标准输入/输出监听传入的请求。
## 使用 Claude for Desktop 测试你的服务器
Claude for Desktop 尚未在 Linux 上提供。Linux 用户可以跳转到 [构建客户端](/quickstart/client) 教程,构建一个 MCP 客户端来连接我们刚刚创建的服务器。
首先,请确保你已安装 Claude for Desktop。[你可以在此处安装最新版本](https://claude.ai/download)。如果你已经安装了 Claude for Desktop,**请确保更新到最新版本。**
我们需要为要使用的 MCP 服务器配置 Claude for Desktop。为此,请在文本编辑器中打开你的 Claude for Desktop 应用配置文件 `~/Library/Application Support/Claude/claude_desktop_config.json`。如果该文件不存在,请务必创建它。
例如,如果你已安装 [VS Code](https://code.visualstudio.com/):
```bash macOS/Linux theme={null}
code ~/Library/Application\ Support/Claude/claude_desktop_config.json
```
````markdown theme={null}
# 快速开始指南
## 1. 安装
### 使用包管理器
```bash
npm install awesome-package
````
### 手动下载
1. 访问 [发布页面](https://github.com/user/repo/releases)。
2. 下载适用于您平台的压缩包。
3. 解压并将二进制文件移动到您的 `PATH` 中。
## 2. 配置
创建一个 `config.json` 文件:
```json theme={null}
{
"port": 3000,
"debug": true
}
```
## 3. 运行
### 启动服务器
```bash theme={null}
awesome-package --config config.json
```
### 验证
访问 `http://localhost:3000/health` 并确认返回 `{"status":"ok"}`。
## 4. 故障排除
| 问题 | 解决方案 |
| ------ | ---------------------------- |
| 端口已被占用 | 在 `config.json` 中修改 `port` 值 |
| 权限被拒绝 | 以管理员身份运行或使用 `sudo` |
````
```powershell Windows
code $env:AppData\Claude\claude_desktop_config.json
````
接下来,你需要在 `mcpServers` 键中添加你的服务器。只有当至少一个服务器被正确配置时,Claude for Desktop 中的 MCP UI 元素才会显示出来。\
在此示例中,我们像这样添加单个天气服务器:
```json macOS/Linux theme={null}
{
"mcpServers": {
"weather": {
"command": "dotnet",
"args": ["run", "--project", "/ABSOLUTE/PATH/TO/PROJECT", "--no-build"]
}
}
}
```
(原文为空,无需翻译)
```json Windows theme={null}
{
"mcpServers": {
"weather": {
"command": "dotnet",
"args": [
"run",
"--project",
"C:\\绝对\\路径\\到\\项目",
"--no-build"
]
}
}
}
```
这会告诉 Claude for Desktop:
1. 有一个名为 “weather” 的 MCP 服务器
2. 通过运行 `dotnet run /ABSOLUTE/PATH/TO/PROJECT` 来启动它\
保存文件并重启 **Claude for Desktop**。
### 通过命令测试
让我们确认 Claude for Desktop 已经识别到我们在 `weather` 服务器中暴露的两个工具。你可以通过寻找 “Search and tools”  图标来验证:
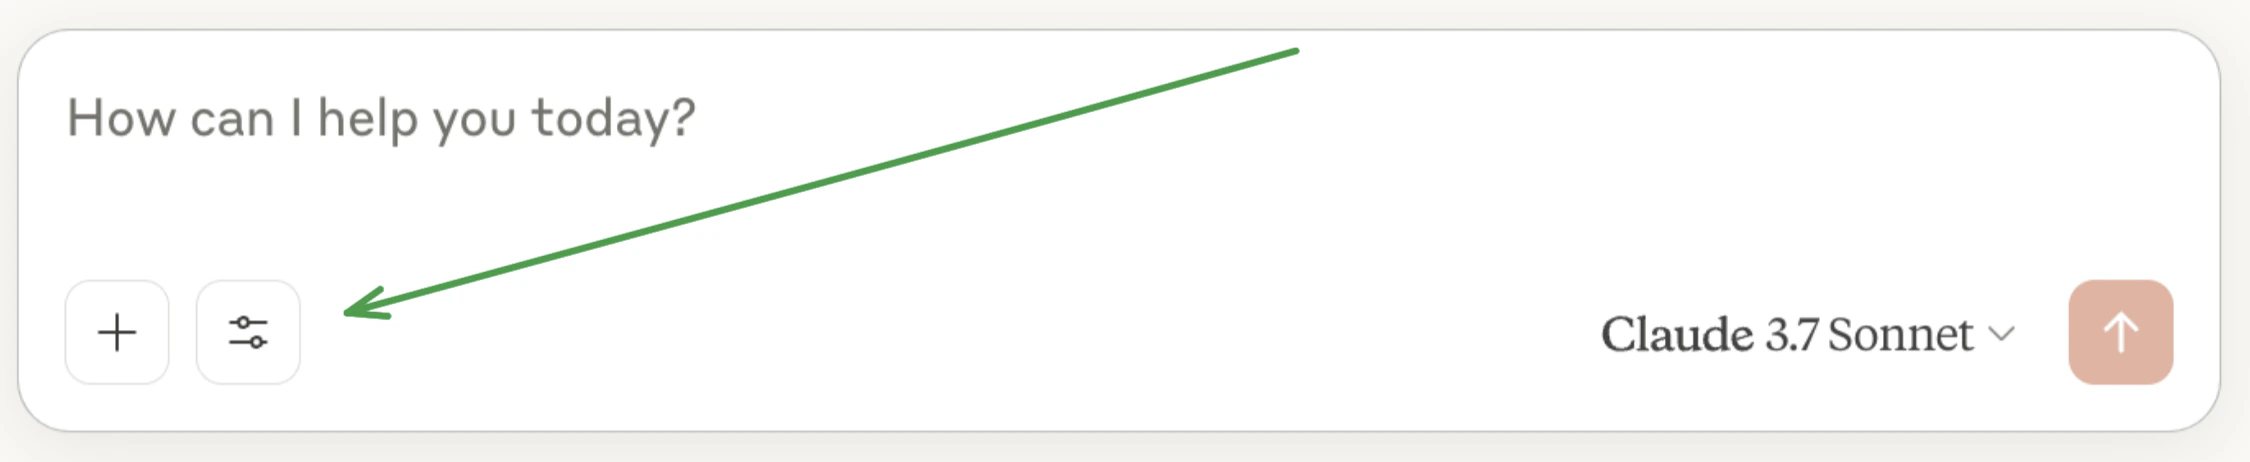 点击滑块图标后,你应该能看到列出的两个工具:
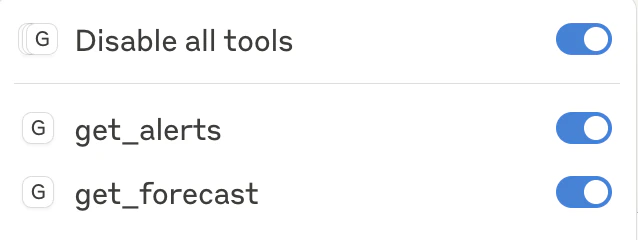 如果服务器未被 Claude for Desktop 识别,请前往 [故障排除](#troubleshooting) 部分获取调试建议。
如果工具设置图标已出现,你现在可以在 Claude for Desktop 中运行以下命令来测试服务器:
* 萨克拉门托的天气如何?
* 德克萨斯州有哪些活跃的天气警报?
由于这是美国国家气象局的数据,查询仅适用于美国地区。
## 背后发生了什么
当你提出问题时:
1. 客户端将问题发送给 Claude
2. Claude 分析可用工具并决定使用哪一个或多个
3. 客户端通过 MCP 服务器执行所选工具
4. 结果返回给 Claude
5. Claude 生成自然语言回复
6. 回复展示给你!
## 故障排除
**从 Claude for Desktop 获取日志**
与 MCP 相关的 Claude.app 日志写入 `~/Library/Logs/Claude` 目录下的日志文件中:
* `mcp.log` 包含 MCP 连接及连接失败的常规日志。
* 名为 `mcp-server-SERVERNAME.log` 的文件包含来自指定服务器的错误(stderr)日志。
你可以运行以下命令列出最近的日志并实时跟踪新的日志:
```bash theme={null}
# 检查 Claude 的日志是否有错误
tail -n 20 -f ~/Library/Logs/Claude/mcp*.log
```
**服务器未在 Claude 中显示**
1. 检查 `claude_desktop_config.json` 文件的语法
2. 确保项目路径是绝对路径,而非相对路径
3. 完全重启 Claude for Desktop
**工具调用静默失败**
如果 Claude 尝试使用工具但失败:
1. 查看 Claude 的日志以获取错误信息
2. 验证服务器能否无错误地构建和运行
3. 尝试重启 Claude for Desktop
**以上方法都不奏效,我该怎么办?**
请参考我们的[调试指南](/legacy/tools/debugging),获取更强大的调试工具和更详细的指导。
**错误:无法获取网格点数据**
这通常意味着:
1. 坐标位于美国之外
2. NWS API 出现问题
3. 你被限速了
解决方法:
* 确认你使用的是美国坐标
* 在请求之间加入短暂延迟
* 查看 NWS API 状态页面
**错误:\[州名] 无活跃警报**
这不是错误——只是该州当前没有天气警报。尝试其他州,或在恶劣天气时再检查。
如需更高级的故障排查,请查看我们的 [MCP 调试指南](/legacy/tools/debugging)
## 下一步
学习如何构建你自己的 MCP 客户端,连接到你的服务器
查看我们官方 MCP 服务器和实现的展示
学习如何高效调试 MCP 服务器与集成
学习如何使用 Claude 等 LLM 加速你的 MCP 开发
如果服务器未被 Claude for Desktop 识别,请前往 [故障排除](#troubleshooting) 部分获取调试建议。
如果工具设置图标已出现,你现在可以在 Claude for Desktop 中运行以下命令来测试服务器:
* 萨克拉门托的天气如何?
* 德克萨斯州有哪些活跃的天气警报?
由于这是美国国家气象局的数据,查询仅适用于美国地区。
## 背后发生了什么
当你提出问题时:
1. 客户端将问题发送给 Claude
2. Claude 分析可用工具并决定使用哪一个或多个
3. 客户端通过 MCP 服务器执行所选工具
4. 结果返回给 Claude
5. Claude 生成自然语言回复
6. 回复展示给你!
## 故障排除
**从 Claude for Desktop 获取日志**
与 MCP 相关的 Claude.app 日志写入 `~/Library/Logs/Claude` 目录下的日志文件中:
* `mcp.log` 包含 MCP 连接及连接失败的常规日志。
* 名为 `mcp-server-SERVERNAME.log` 的文件包含来自指定服务器的错误(stderr)日志。
你可以运行以下命令列出最近的日志并实时跟踪新的日志:
```bash theme={null}
# 检查 Claude 的日志是否有错误
tail -n 20 -f ~/Library/Logs/Claude/mcp*.log
```
**服务器未在 Claude 中显示**
1. 检查 `claude_desktop_config.json` 文件的语法
2. 确保项目路径是绝对路径,而非相对路径
3. 完全重启 Claude for Desktop
**工具调用静默失败**
如果 Claude 尝试使用工具但失败:
1. 查看 Claude 的日志以获取错误信息
2. 验证服务器能否无错误地构建和运行
3. 尝试重启 Claude for Desktop
**以上方法都不奏效,我该怎么办?**
请参考我们的[调试指南](/legacy/tools/debugging),获取更强大的调试工具和更详细的指导。
**错误:无法获取网格点数据**
这通常意味着:
1. 坐标位于美国之外
2. NWS API 出现问题
3. 你被限速了
解决方法:
* 确认你使用的是美国坐标
* 在请求之间加入短暂延迟
* 查看 NWS API 状态页面
**错误:\[州名] 无活跃警报**
这不是错误——只是该州当前没有天气警报。尝试其他州,或在恶劣天气时再检查。
如需更高级的故障排查,请查看我们的 [MCP 调试指南](/legacy/tools/debugging)
## 下一步
学习如何构建你自己的 MCP 客户端,连接到你的服务器
查看我们官方 MCP 服务器和实现的展示
学习如何高效调试 MCP 服务器与集成
学习如何使用 Claude 等 LLM 加速你的 MCP 开发